About 5 years ago, I began my quest to vastly improve my fitting and alterations skills. I started sewing in 8th grade, and while I was a quick learner making a lot of mistakes along the way, I never learned how to fit other than using lengthen and shorten and a few other common sense fixes. This was really a shame. I made a lot of beautiful things over the years with fit being hit or miss. So it was a pleasure to discover more sewing/fitting resources via the Internet as well as the opportunity to take several fitting classes online. I've written about this before, but my fave fitting gurus are Shannon Gifford and Jean Haas. I've learned so much from them. They are both knowledgeable and gifted instructors that have taught me so much.
I have to admit, the process of learning how to fit wasn't easy. I couldn't see things the way they saw it and asked a ton of questions all the time. Over time, however, so many light bulbs went off, and everything became much more clear. Not only did I take the their classes (sometimes twice because they were so good), but I read a ton of fitting/pattern alterations books and did a lot of fit research. Kathleen Fasanella's Fashion Incubator is a wealth of information, and her Saran Wrap Block info on her blog was instrumental in helping me develop an upper body sloper pattern. Once I created that sloper, so much information just fell into place for me on an intellectual fitting level.
I know some people can use a commercial fitting shell to determine their pattern alterations that are needed for their body. Instead of trying to fit a shell to my body (and a lot of head scratching along the way), I decided Kathleen's Saran Wrap block would be easier, just wrap it on, mark it, and peel it off. Using duct tape was an option, too, but saran wrap was quicker. No calculations, virtually no math. Utilizing methods learned in Jean's class, I turned that Saran Wrap block into a sloper pattern.
These days I can trace off a pattern and know intuitively some of the pattern alterations I will have to make, just by looking. In fact, I don't even have to take out my sloper pattern to make the comparison. There are two things I look for right off the bat--I'll discuss that in my next post in a day or so. Stay tuned on that thought.
Which brings me to Pat, one of my friends who is also a sewing student. As I teach her how to sew, I also am teaching her basic fitting principles. IMO, a good teacher teaches both at the same time, but only fitting principles in a very basic format so as to not to overwhelm the student. For example, she's making the tunic from the S.E.W. Everything Workshop Book. That's why I made it and posted about it yesterday. I like to make things up before my students do. I read the instructions in the book, add to/modify/clarify the instructions as I see fit (no pun intended). From a beginner's viewpoint, there are sewing areas in which I "hold their hand" so they maintain their confidence.
The first garment fitting principle (after the simple lengthen/shorten line) we covered was the bust dart pointing to the apex. We lowered the bust dart as I explained this is a very common alteration many women must make. She is finishing up her top on her own as her homework--just tweaking the side seams to her liking and hemming it as per my instructions. It really looks nice! Her second garment project is the Cape Mod from the same book. We picked out a lovely fabric at our local fabric store as well as matching lining. We're using a cotton flannel fabric for the interlining. I'm making the same cape up this weekend to preview the instructions and methods. Today we also worked on making buttonholes on her machine. She has a Sears Kenmore from the '70's, probably a Janome. It says "Made in Japan" on the body interior. Isn't Janome a Japanese company? I think so. She has never made buttonholes before, so we went through it step by step. Her homework is to make 6-8 more on her sample fabric and a few more on her interfaced fashion fabric for her cape. I like repetition for confidence. It does the sewing skills good.
Another thing I was thinking about today were sewing errors. There's a thread about it at Patternreview, "When to Let Your Errors Go." When Pat was sewing the armhole facing to the armhole of the bodice, she was being very careful. But still, there was a very tiny pucker. She was going to rip it out, but then said, "When I turn the facing to the inside, the pucker will actually disappear right on the edge. It won't be noticeable." She was absolutely right on that. I told her a good steam might take it out, but when turned, no one would see that tiny pucker even if the steaming wasn't successful.
A good sewer knows when to seam rip and when to let tiny errors go. I'm so glad she made this assessment and decision on her own. No one will notice. No one. Of course, purists might say, "Fix it!" But that's the beauty of it--a beginning sewer making a definitive decision. Not obsessing over something that won't be seen. Obsessing can easily lead to frustration. Frustration can mean walking away and never sewing a stitch again. I don't want that to happen. We all have to determine our own level of "allowable" errors. Some of us are perfectionists, some are not. My own allowable error level is, "Is it noticeable?" I use the 2-foot rule on that one. "Will the error affect fit?" That's always a question I have to answer as well.
This weekend I have to call three more eager, potential students. It will be exciting to share the love :) ! I'm SO looking forward to it.
Friday, February 27, 2009
Thursday, February 26, 2009
Sewing with Half a Brain
That's right. I'm sewing with half a brain. Every have one of those awful colds where your sinuses are acting up, your head feels squeezed, your nose is plugged, and your swimming in mucous? Yep, that's what I got. Oh...and a sore throat too. Two kids with different colds gave me both at the same time.
I was at the gym yesterday and barely got through my weight workout. I spent 10 minutes on the treadmill and felt my eyes closing on the 9th minute so it was time to get off. Didn't even go today because this darn cold has me so tired.
Anyway, I've been struggling to sew a simple, easy-peasy tunic, the one from the S.E.W Everything Workshop book by Diana Rupp. One of my sewing students is making the tunic now, and I like to make the things before they do to work out any issues a beginner might have. There was one, but I'll write about it later.
It's a very basic tunic, mostly perfect for beginners. It's sized with plenty of ease and somewhat shapeless, but it does have much potential and is easy to alter. Darts will do wonders with this number which I plan to show to my friend tomorrow during our lesson. I'm made some typical alterations on this one, but have to remove side seam width, lower the front neckline, raise the armholes along with adding vertical fisheye darts or tucks on the next version. I want to show my students how they can elevate this style for a more shapely, figure-flattering look.
Here is the dress in two current states. Please bear with my sickly look--makeup is doing wonders at this point, and I can barely keep my eyes open. Pictures have been lightened to show contrast with the dark colors.
Oversized, flowing tunic, which actually would be a good beach coverup:
 Here's a more fashionable version belted.
 And now I'm going to bed, 'cuz this sick chick needs a rest.
I was at the gym yesterday and barely got through my weight workout. I spent 10 minutes on the treadmill and felt my eyes closing on the 9th minute so it was time to get off. Didn't even go today because this darn cold has me so tired.
Anyway, I've been struggling to sew a simple, easy-peasy tunic, the one from the S.E.W Everything Workshop book by Diana Rupp. One of my sewing students is making the tunic now, and I like to make the things before they do to work out any issues a beginner might have. There was one, but I'll write about it later.
It's a very basic tunic, mostly perfect for beginners. It's sized with plenty of ease and somewhat shapeless, but it does have much potential and is easy to alter. Darts will do wonders with this number which I plan to show to my friend tomorrow during our lesson. I'm made some typical alterations on this one, but have to remove side seam width, lower the front neckline, raise the armholes along with adding vertical fisheye darts or tucks on the next version. I want to show my students how they can elevate this style for a more shapely, figure-flattering look.
Here is the dress in two current states. Please bear with my sickly look--makeup is doing wonders at this point, and I can barely keep my eyes open. Pictures have been lightened to show contrast with the dark colors.
Oversized, flowing tunic, which actually would be a good beach coverup:
Here's a more fashionable version belted.And now I'm going to bed, 'cuz this sick chick needs a rest.Monday, February 23, 2009
S4074 In Action!
Here's the Simplicity 4074 wrap dress on the proud owner :) ! I really like it, although I don't find it to be the most flattering. Wraps are supposed to be slimming, and I was hoping for that type of silhouette. Perhaps it is the Slinky fabric. It's hard to see the diagonal and vertical lines of the dress so maybe that's it. Also, I had to take in the waist 2" and it could probably use a bit more. We'll see how the dress shapes up with version no. 2 in a velvet knit.


Here's the back, virtually wrinkle free:

IMO, Slinky is a dressy, yet sporty, fabric. Therefore, I did double needle topstitching on the neckline, sleeve and dress hems as shown here:

I also tacked the front to avoid overexposure. The weight of the Slinky is always an issue for me. Facings were also omitted--turn and topstitching was quick and easy.
Here's the back, virtually wrinkle free:
IMO, Slinky is a dressy, yet sporty, fabric. Therefore, I did double needle topstitching on the neckline, sleeve and dress hems as shown here:
I also tacked the front to avoid overexposure. The weight of the Slinky is always an issue for me. Facings were also omitted--turn and topstitching was quick and easy.
The only thing I don't really like about the dress? The neckline on the sides of the neck is very close and curves slightly up. The result is a broad shouldered look, and I'm anything BUT broad shouldered. Narrow shouldered to be exact. I can overlook that though, because overall the fit is really nice. The nature of Slinky at work...very forgiving ;) . And lots of alterations/blended sizing to make it work just right.
Please, don't talk about my shoes LOL! Ugly flats for sure. A bit of heel would do a lot for the total look. Gotta get myself some nice, *comfortable* black heels. Where the heck do I find those???
Off to work on a tutorial...
Tutorial: Altering a Sleeve for a Forward Shoulder
A few days ago, a PR member sent me a PM about altering a forward sleeve. She needed a bit more info, and I thought it would be easier to answer with pictures so I decided to create a tutorial for it.
Bear in mind: WHAT I'M ILLUSTRATING IS BODY SPECIFIC FOR MY FIGURE. This may not work on someone else's figure, so it would be prudent to check out my slide show to see if my figure is similar to yours. I'm working off of a 42-year old body with forward shoulders and broad upper back. Long arms, long legs, short waist, rectangular torso with not a whole lot of waist definition, 5' 7" in height, somewhat slender, hollow chest, full bust (propped up most of the time with a Wonder Bra LOL), and narrow shoulders.
So, knowing that, let's proceed...
Step 1 - Alter the bodice.
Let's assume it's a 1/2" forward shoulder alteration. Remove 1/2" from the front as shown and add 1/2" in the back as shown. Another option to consider is moving the entire shoulder seam 1/2" forward. In the pic below I'm tapering to 0 at the neckline rather than moving the entire shoulder seam forward. Whatever works best.

Step 2 - Examine the sleeve pattern. Most sleeve patterns I see are like the one below and symetrical. If this is the case, the sleeve will need to be altered for a better fit since this draft does not mirror a typical figure. Draw a vertical line from the center of the sleeve cap at the top to the middle of the hem at the bottom. Draw a horizontal line perpendicular to the vertical line across the sleeve right above the notches. Also draw in a hash mark on the horizontal line a 1/2" away from the vertical line toward the front of the sleeve as shown.

Step 3 - Cut the pattern on the horizontal line. Move the upper pattern forward a 1/2" so the vertical line on the top piece is aligned with the hash mark.

Step 4 - True the cutting lines. Normally I don't true my lines this way except for sleeves. Flatten/true the back as shown, bubble and true the front as shown. The sleeve is now asymetrical reflecting a true body shape.

Normally, this would be the end of it, but not for me...what else is new. I measure the SEAMLINE of the front and back of the sleeve separately as shown below. Subtract the seam allowances from your measurements.

Then I measure the front and back armholes separately on the bodice pieces. Subtract the seam allowances from these measurements.

Now I make comparisons of the front sleeve seamline and front bodice armhole seamline and the back sleeve seamline and back bodice armhole seamline as shown on my "math" sheet below.
 If there is more than a 1/2" difference, I adjust the sleeve. Usually there is no problem on the back, but there is too much ease on the front to the point where it would look gathered. Therefore, using the above example, the front sleeve has 3/4" excess of fabric over that 1/2" of preferred ease. So I reduce the ease in the front of the sleeve as shown below. Draw a line (shown in green) 3/4" above the horizontal line.
 Slash the green line and overlap it to the blue line to reduce the ease as shown below.

True the cutting line as shown below:

Bear in mind: WHAT I'M ILLUSTRATING IS BODY SPECIFIC FOR MY FIGURE. This may not work on someone else's figure, so it would be prudent to check out my slide show to see if my figure is similar to yours. I'm working off of a 42-year old body with forward shoulders and broad upper back. Long arms, long legs, short waist, rectangular torso with not a whole lot of waist definition, 5' 7" in height, somewhat slender, hollow chest, full bust (propped up most of the time with a Wonder Bra LOL), and narrow shoulders.
So, knowing that, let's proceed...
TUTORIAL: Altering a Sleeve for Forward Shoulder
Step 1 - Alter the bodice.
Let's assume it's a 1/2" forward shoulder alteration. Remove 1/2" from the front as shown and add 1/2" in the back as shown. Another option to consider is moving the entire shoulder seam 1/2" forward. In the pic below I'm tapering to 0 at the neckline rather than moving the entire shoulder seam forward. Whatever works best.
Step 2 - Examine the sleeve pattern. Most sleeve patterns I see are like the one below and symetrical. If this is the case, the sleeve will need to be altered for a better fit since this draft does not mirror a typical figure. Draw a vertical line from the center of the sleeve cap at the top to the middle of the hem at the bottom. Draw a horizontal line perpendicular to the vertical line across the sleeve right above the notches. Also draw in a hash mark on the horizontal line a 1/2" away from the vertical line toward the front of the sleeve as shown.
Step 3 - Cut the pattern on the horizontal line. Move the upper pattern forward a 1/2" so the vertical line on the top piece is aligned with the hash mark.
Step 4 - True the cutting lines. Normally I don't true my lines this way except for sleeves. Flatten/true the back as shown, bubble and true the front as shown. The sleeve is now asymetrical reflecting a true body shape.
Normally, this would be the end of it, but not for me...what else is new. I measure the SEAMLINE of the front and back of the sleeve separately as shown below. Subtract the seam allowances from your measurements.
Then I measure the front and back armholes separately on the bodice pieces. Subtract the seam allowances from these measurements.
Now I make comparisons of the front sleeve seamline and front bodice armhole seamline and the back sleeve seamline and back bodice armhole seamline as shown on my "math" sheet below.
If there is more than a 1/2" difference, I adjust the sleeve. Usually there is no problem on the back, but there is too much ease on the front to the point where it would look gathered. Therefore, using the above example, the front sleeve has 3/4" excess of fabric over that 1/2" of preferred ease. So I reduce the ease in the front of the sleeve as shown below. Draw a line (shown in green) 3/4" above the horizontal line. Slash the green line and overlap it to the blue line to reduce the ease as shown below.True the cutting line as shown below:
And that completes the alteration. I do this for almost every sleeve. I hope this information is helpful to one of my body twins out there.
Sunday, February 22, 2009
Simplicity 4074
This is a much improved version from my purple wrap top which was a muslin. The purple top was made from a crappy knit, really awful, which couldn't hold a press and was so flimsy. I much prefer "beefy" knits with some texture.
Here's the pattern:
 Here's my version:
Here's the pattern:
Here's my version: It's made from a lovely Slinky print, not without the woes from my previous post. Namely a major fabric snag in the fabric that I didn't realize was there when cutting. It really did look like a tiny crease. However, the fabric print kind of hides it so it shouldn't be too noticeable. I lightened up the photo so you can see the print. The fabric is kind of a shimmery grey shade with a navy blue raised design. The print has kind of a velvet feel.
I'll try to do a review soon and model it. The fit is superb on this one, although I don't think Phat Chick (ETA--as in my Phat Chick dress form) does it justice in her overstuffed fiberfill bod. Also, it's amazing what moving the bust fullness will do, isn't it? I thought that was my major fitting issue on the muslin so I adjusted the bust fullness and voila! There's a lovely purple velvet type of knit in my stash from PR Weekend 2006 so a second wrap dress is in the works. The pattern ties were omitted because, well, I just don't like ties.
More later.
Saturday, February 21, 2009
What's Wrong With This Pic?
Take a look. What do you see besides an obscure view out of my front window?
 Yes, @"*#)@*#! You see a flaw in a piece of my patterned Slinky fabric. I'm making Simplicity 4074, the wrap dress. This was *supposed* to be a good dress. It's okay, I'll need a black slip. But still. When I bought this fabric, I thought that snag was a crease in the fabric. It's on several pieces of the dress in different places. I created princess seams on the back and it's on the lower parts of two of the pattern pieces. Now it's on a front side panel.
So what gives? It hasn't been the best week, certainly not the worst, but happy that it's almost over. First that crappy plaid (of which I purchased more last night to cut the front pieces--blech!), then getting rear ended (thank you, everyone, for your kind words), then taking it easy the day of the accident and making this dress, only to find there's that "lovely" snag. It shouldn't be that noticeable with a slip, but still. It has jaded my view on this project from what should have been a pretty decent wrap dress.
So...the positive points:
The good thing is, it it will still be wearable.
Healthwise, other than just a very mildly sore front/side neck muscle which only is a little achy a couple times during the day, my health is absolutely fine. The only time it slightly bothered me yesterday at the gym was doing situps on a steep incline on the incline bench. And when I lifted my head to rest it on my pillow while lying on my side. Other than a few moments here and there, I feel absolutely fine.
The lounge pants? They'll get made. And so what if the stripes are off--they pants are not for me LOL.
In the grand scheme of things, life is good. Don't sweat the small stuff.
Tuesday, February 17, 2009
Horrors and Joys
Quick blog post.
Look at this UGLY situation:
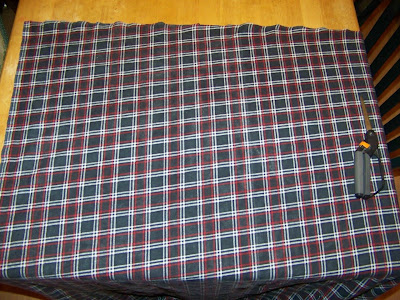
Talk about a grainline nightmare (yes, it's torn on the crosswise thread)! I needed a flannel plaid (those teen-age lounge pants) in red, white, and black. Searched all over the Internet and couldn't find anything. A major retailer (you know who) had this on the clearance table. Why oh why didn't I check the crosswise threads with the print--I should have known better. It has happened to me before with this retailer. This, however, is the worst grainline to print horror I've seen ever! I'm making lounge pants for DD#2 way off grain and even then, the print is skewed as well. If the pants were for me, I'd return the fabric. What a sewing headache/mess.
Now here's the joy. Remember that gold leather I mentioned before? Here it is with the blue wool and print lining. Mmmm! I'm loving this trio of fabrics. I'd like to make this up into my jacket before the weather turns. Hopefully I'll get it done.

Sunday, February 15, 2009
A Breather!
Okay. I feel like I'm up to my neck in work. Swimming with just my nose right above the water. So here it is late Sunday night and I'm taking a breather. So much work it feels like I'm back in college.
Which leads me to talk about dreams. You know when life gets busy and you get weird dreams? Most of the time, I don't remember my dreams after about 5 minutes of being awake. I always remember the panic, though, of those dreams when your college calls you after you've been on the job 20 years and says, "Oh...BTW, you missed 3 credits and you didn't really graduate!"
Anyway, a few days ago I had a very strange dream. Some of you know that one of my daughters plays softball. She's a pretty good pitcher and defensive player. And amidst all the hullabaloo of my busy week, I actually remember a weird dream. I dreamed I was a softball pitcher and a good one at that. (Told you it was a dream!). The coaches were all excited about putting me on the mound and so was I. Until I remembered I couldn't field at all. Couldn't catch, couldn't throw (now that's real life). And I was in a state of panic telling them, "What do you want me to do if the ball comes back at me??? I can't catch, nor throw. What the heck am I supposed to do?" No one seemed to care. They kept telling me I'd be fine, nothing to worry about. And I'm going crazy thinking about a dreaded line drive. No one was worried except me. Someone asked, "How come you can't play any defense?" I told them it was because my mom and dad never played catch with me. (Where's the laughing emoticon LOL!) And then I woke up.
I told you it was weird. I couldn't wait to tell DH and the kids because it was kind of funny. To know me is to know I have no athletic ability. A gym rat, but no athlete. The weirdest dream in a while.
Has anyone else had a crazy dream lately? Good enough to share? Gotta get back to work. Little mini breaks are good though.
Tuesday, February 10, 2009
Mini Vacation
See ya in about two weeks! I have to spend a lot of time working on my business which leaves no time for blogging and very little Internet surfing. I'm hoping to catch up on blog reading Saturday morning with my coffee but that's about it.
Happy Sewing until then...
Happy Sewing until then...
Monday, February 9, 2009
The Real Life of the Redesign
If you've been reading my blog for a while, you'll remember my woes regarding this ugly wadder of a project. That little mini dress "concept" though, however, did not totally escape my mind.
 A contemporary look with boots:
 A sporty/dressy look with ankle boots (like a similar look I saw in Lucky *many* months ago--yeah I'm out of fashion--what's new...) :


I've modeled these outfits (embarrassingly without accessories--to know me is to know I feel naked with pretty earrings) because I've tried really hard to think of ways I can wear this top. Coordinating somewhat fashionable outfits does not come easy to me. In fact, maybe some of these styles are not that fashionable, and if they're not flattering on me, let me know. Putting together these outfits was hard because God gave my older sister a double dose of fashion sense and accidentally skipped me. On a positive note, I think my ability to determine what works and doesn't work for my figure as far as specific styles has definitely improved over the past several years. (Only took me how long???) So I've learned to play up my long arms and legs, good shoulders and full bust. Downplay my rectangular torso and minimize my never-will-be-small AND short waist.
Overall, I really like this tunic top. I chose a purplish/blueish velour knit in my stash (think it was from Spandex House from PR Weekend 2006), and while it doesn't have as much stretch as other knits I've used for my Santa Monica tee, it still works. If a nice sweater knit ever comes my way, a second top of this style will definitely be in the works. There are two other knits in my stash from Spandex House--a red and a purple--that are more for a holiday type of garment that I was thinking about using, but the velour won out.
What I've had to accept about this top:

So that completes my resdesign. I'll do a review on it over at PR in the next couple of days but there isn't much new to add. Will probably just link to my blog posts on the design and finished product. Also, I recently have seen some PR members lament the return of these fluid, babydoll type of styles in the over-40 group. It really depends on one's figure though (and, of course, a bit of sassy attitude ;) . Gosh, these are my fave styles. They hide a multitude of sins and with careful tweaking, they CAN work. Even my 72-year old mom can pull of a sassy short-skirted business suit and look terrific so it IS do-able. Whether I'm in this style at 60, only time will tell LOL.
In addition, I just realized I haven't shared with you the matching gold-toned leather that I purchased for my upcoming jacket. It's really lovely and a perfect match, thanks to the helpful staff of Leather Suede Skins in NYC. I'll post that soon.
When I was working my my redesign of the Newport News tunic, I wanted a long-enough length to wear it as a top or a mini dress. I got what I wanted IMO. It is exactly what I had in mind for the wadder. Bear in mind, my redesign has about 0" of ease from the bust up. Just a smidge at the under bust to the skirt portion where it has front gathering. The ugly wadder project had a WOPPING 10"of ease at the bustline. Can you imagine what it would have looked like on me? It would have fit just "swimmingly"! Now, more than ever, I shake my head and wonder what I was thinking when I bought it.
Anyway, Lindsay inquired about pics wearing it (BTW, check out her Chanel Gem if you haven't already!) the other day so I decided to model all ways I might wear this tunic. Here is the redesign in real life, which IMO is really important because dress forms just don't tell all.
A casual look with jeans:
A contemporary look with boots:A sporty/dressy look with ankle boots (like a similar look I saw in Lucky *many* months ago--yeah I'm out of fashion--what's new...) :Just dressy:
I've modeled these outfits (embarrassingly without accessories--to know me is to know I feel naked with pretty earrings) because I've tried really hard to think of ways I can wear this top. Coordinating somewhat fashionable outfits does not come easy to me. In fact, maybe some of these styles are not that fashionable, and if they're not flattering on me, let me know. Putting together these outfits was hard because God gave my older sister a double dose of fashion sense and accidentally skipped me. On a positive note, I think my ability to determine what works and doesn't work for my figure as far as specific styles has definitely improved over the past several years. (Only took me how long???) So I've learned to play up my long arms and legs, good shoulders and full bust. Downplay my rectangular torso and minimize my never-will-be-small AND short waist.
Overall, I really like this tunic top. I chose a purplish/blueish velour knit in my stash (think it was from Spandex House from PR Weekend 2006), and while it doesn't have as much stretch as other knits I've used for my Santa Monica tee, it still works. If a nice sweater knit ever comes my way, a second top of this style will definitely be in the works. There are two other knits in my stash from Spandex House--a red and a purple--that are more for a holiday type of garment that I was thinking about using, but the velour won out.
What I've had to accept about this top:
- It's velour. It's drapey. I will see draglines simply due to the fabric. Kind of like panne velvet in that respect.
- It tends to cling to pantyhose and/or tights. The skirt portion could have been lined with Bemberg. That would necessitate putting a back horizontal seam in again--the one I removed on the pattern. Every time I stood up in church I had to casually pull down on the tunic hem. (Hence, bland, off-white beige underwear is a necessity with pantyhose and black undies are a must with black tights. Naturally, thongs are out of the question. Occasionally the back will get hung up on my jeans, too, so some type of lining might be under consideration on my second version whenever that will be.
- The horizontal bust darts. Truthfully, I hate horizontal bust darts, especially on my figure. Kind of a matronly look. But I needed more shaping below the bust right above the gathers. If there wasn't it, it would be a real preggo look with the bodice fabric falling more from the apex rather than the underbust. I think the pic below shows the underbust shaping rather well. IMO, this is a critical area of shaping on a dress like this. It creates a slimmer profile for a babydoll style AND it highlights a full bust well. Velour minimizes the appearance of the bust dart anyway.

- I didn't go as low as I wanted to with the scoopneck. For modesty sake. A short little number like this would look a bit tart-like with cleavage.
I mentioned on the back I used princess seams. Originally, on the muslin, I had back gathering. It didn't work at all. It made my backside look huge and very unflattering. Even tried tucks instead but it didn't work. So I made the switch to princess seams. Here's a pic of the back. Again, you'll see pronounced draglines as I twist around--the nature of the fabric.
So that completes my resdesign. I'll do a review on it over at PR in the next couple of days but there isn't much new to add. Will probably just link to my blog posts on the design and finished product. Also, I recently have seen some PR members lament the return of these fluid, babydoll type of styles in the over-40 group. It really depends on one's figure though (and, of course, a bit of sassy attitude ;) . Gosh, these are my fave styles. They hide a multitude of sins and with careful tweaking, they CAN work. Even my 72-year old mom can pull of a sassy short-skirted business suit and look terrific so it IS do-able. Whether I'm in this style at 60, only time will tell LOL.
In addition, I just realized I haven't shared with you the matching gold-toned leather that I purchased for my upcoming jacket. It's really lovely and a perfect match, thanks to the helpful staff of Leather Suede Skins in NYC. I'll post that soon.
Saturday, February 7, 2009
We Interrupt the Regular Scheduled Programming...
...for Ducks and Couds??? DD#2 was with me last week at Walmart when I picked up household essentials, and at *HER* request we bought some fabric other than cotton muslin for her Spring semi-formal dress. She's going to a sleepover tonight and wanted some new pajama pants. She's always been a cuddly child (well, maybe not so much now at 14 ;) ) but ducks and clouds? She marches to the beat of her own drum and no one elses. Much like her Momma :) .

She thought these print fabrics were cute so I bought them for her, and she's been on my case to get them done by tonight. Yesterday I cut them out and basted them for fit. These are TNT, but she's really fussy about fit. Every fabric seems to feel (fitwise) slightly different to her. So I have to let out or take in a smidge here and there. The waistband just need to be done and the hem edge is already serged so it's just turn under and topstitch.
The original pattern calls for a homemade-like drawstring method, however, I prefer elastic. DD#2 wanted drawstring though. So I decided to blend both methods and use elastic on the back waist and drawstring on the front. I'm telling you--she is fussy. The waistband can't be too loose. That bothers her. So at least she'll be able to adjust the drawstring in the front to her comfort level.
This is the reason why I exclusively use the casing method for elastic over zigzagging elastic to the raw edge. Even if I cut the elastic to what she likes, the minute she tries on the pants she'll say, "Um, it's still too loose. Can you tighten it a bit more?" This usually happens 2 or 3 times until it's the way she likes it. So I'm hoping to avoid this with a drawstring front. The reason why I'm not doing the drawstring in the back is that I personally don't like something cutting into my back and thinnish drawstrings will do that. The same reason why I don't like halters knotted at my neck or back ties at my mid back. It's just a bad feeling. If I don't like it, she definitely won't like it either. So I have to take my shower, get moving, and go out to the fabric store to get some elastic this morning.
Once I'm finished with this, I will post pics of me in my redesigned top. I'm planning on wearing it today, then will baste the back princess seams permanently. I want to make sure I'm happy with the fit after a day's wear before permanently stitching the seams.
Thursday, February 5, 2009
The Completed Redesign!
I finished my redesign from the original Textile Studio Santa Monica Tee to the copycat version of a Newport News Tunic, a day early too! Here it is:

I started out with my TNT pattern of the TS Santa Monica Tee...
 ...and heavily redesigned it to look more like the one I wanted in the picture from this link.
It was supposed to look like the Newport News version except I wanted an angled "horizontal" seamline and a scoopneck instead of a V.
I love it and will include more details of it tomorrow. It just needs permanent stitching in a few areas because it was basted for fitting purposes.
More tomorrow.
Monday, February 2, 2009
Thoughts on the Redesign
First muslin of my Santa Monica Tee to Fashionable Tunic has been made. It's fairly good. Some tweaking was necessary because of the side view. See below:

The gathering was fine under the bust in the front. What wasn't fine is that it just "hung" under the bust, more like straight down from the apex. From the front it looked fine, from the side not so good. So I decided more shaping was necessary in the upper front bodice piece. I created a vertical dart under the apex then transferred it to the side seam. The horizontal bust dart will be stitched in fabric. This will give the side view a more shapely appearance instead of the dreaded "tent effect". This way, it will hug the body under the bust.
Also, instead of using all gathering, I will use two pleats in the lower piece in the area of the bust apex with gentle gathers right at the center front. The pleats will be stitched down about 1 - 2" below the horizontal seam. This way I still get the look of gathering at the front, but the pleats will help it look not so "preggo" from the side view.
The back side view was horrendous. No matter what I did--gathering or pleat/tucks--it made me look like I had a bubble backside. I eliminated the horizontal seam on the back on the pattern and am just using vertical princess seams all the way down on the back. Much more flattering.
The lower sleeves need a bit more balanced fullness and the horizontal seam on the sleeve needs to be moved down one inch. It was bothering my elbow.
All these changes/alterations were done this afternoon. The pattern is now ready for good fabric. I'm really excited about this top because it can be a hip little dress with boots or a sporty tunic top with jeans or leggings. I'm shooting for a new top by this Friday. Wish me luck!
BTW, a big Thank You to Connie for another Kreativ Bog Award! I've been feeling out of it the past several days and that made me feel much better.
Also, did the groundhog see his shadow today? You would think since I live in groundhog country that I would know, but I don't.
Subscribe to:
Comments (Atom)