Showing posts with label alterations. Show all posts

Saturday, October 3, 2009

Redraft No. 1 of McCall's 4922


Here's the pattern, same as my previous post


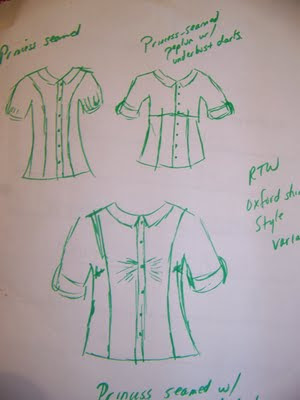
We're talking a basic oxford style. There's a bit of variations on sleeve detail, hemlines, and bias cut pieces on the pattern, but I need something more though. We're talking teens with attitude. The "standard" oxford style just won't do. So I drew some sketches. Here they are:


So for my first modified version, I chose the bottom sketch. It has bust gathering detail at the CF at the bustline. So I pull out my cutting mat and get to work on the pattern piece with slash and spread. This is what I ended up with (adding 1.5" of gathers which worked out perfectly):


For this pattern, I used a 10 at the neck/shoulders/upper chest, then morphed to a 14 at the full bust down. The other alterations I did were forward shoulder on the bodice with the coresponding alteration done on the sleeve as found on my Sleeve Tutorial blog post and a very slight swayback tuck (1/4" above the waist).


That swayback tuck will vary according to what base size I use. If I used a 12, I'd do about a 1/2" tuck. Which brings me to a question I've seen on the PR boards about cutting a CB seam after doing a swayback tuck. People seem to stress over this, and I don't know why. Here's the issue:


The top of the pattern at the CB neck and the bottom of the pattern at the CB hem are on the bold yellow line. After doing the swayback tuck, the back edge "dips" or curves inward. How do I handle this? Simply align the CB at the neck and the CB at the hemline at the fold in the fabric. It will end up looking like this:

See how there is a slight excess of fabric at the CB because of the swayback tuck? It would, of course, be more if I did a 1/2" tuck which I sometimes do. HOWEVER, the excess of width is usually not a problem. Sometimes I ignore it, sometimes I eliminate the excess by removing width from the princess seam which I have shown in the photo with a new cutting line in white.

This isn't rocket science. It's just a common sense approach to dealing with this issue. And yet I see a number of sewers fretting about this particular alterations. On a top without a princess seam, it can simply be removed from the side seams as well.


Believe me, when I started with tissue fitting and pattern alterations, I made big issues out of small things. It's really easy to do because it's easy to get overwhelmed, especially on a figure like mine that requires oodles of pattern alterations on a base size 12. Morphing from a 10 to 14 is my favorite option, although some patterns I can't find in that range so my pattern alterations increase exponentially.

So where am I on this top? Almost done! All I need to do are the buttons/buttonholes and hemming. Here's a pic from yesterday without the addition of sleeves. Please excuse the hasty photo. I didn't have time to press it again and this cotton is like a wrinkle nightmare. In retrospect, a cotton/poly blend would have been better. But you get the general idea.


I should be finished with it soon, maybe tomorrow. This top takes me back to the 80's for sure! I had this one Brooke Shield's blouse pattern that I made at least 5 times when I was in high school. Truthfully, it has been years since I've made a blouse. But I'm really liking this one. Sure hope DD#2 doesn't want to snatch this for her school wardrobe. This is her "muslin" since we wear the same size. It's actually her 2nd choice top. Her first choice is the one with underbust horizontal seam with vertical tucks to be added on the bottom pieces, kind of like the shirt below in a recent Burda WOF mag. This style will be my next redraft. BTW, does anyone have a 9/2009 Burda WOF they would like to sell me??? This is an awesome top and I'd love to trace it as is. It would save me redrafting time.


BTW, thank you, everyone, for your comments on school dress code/uniform policies. I must add that this is our first year. That is why it is SO darn expensive for me. Starting from scratch for four kids. It is truly a monetary nightmare. They have virtually nothing to use from the previous year to build on for a school wardrobe. Subsequent years will not be so bad, but the first year is very hard. I feel very sorry for the many parents in our school district who have lost their jobs and are in the same boat of buying everything new. Relying on hand-me-downs, at least in my family, is not an option this year. Virtually everything is brand new.


Right now I'm adding a few nice pieces here and there for DD#2. She actually likes and wears what I make her. Same with the boys. DD#1 thumbs her nose, but I know she secretly "approves" but will never actually wear what her mother has made.


Okay. More later. My fingers are tired and I'm going to enjoy my Saturday evening glass of wine.

Sunday, March 1, 2009

Saran Wrap Block and the Commercial Pattern: Part I

I'll preface this post by saying, "Watch what you wish for 'cuz you just might get it!" And I'll add a preliminary conclusion of, "A Saran Wrap Block is an extremely valuable tool in the fitting tool arsenal!" This post is very long and is about fitting. So if you don't like to think about fitting and pattern alterations, stop reading here and check out someone else's blog at this point ;) .

When people post about fitting problems, I love to read what people suggest the solution will be. Some will be spot on, some will be way off, some have ideas and suggestion that are close to the most effective and viable solution to the fit issue at hand. I only make suggestions if I identify with the body type or have dealt specifically with the same fit issue. After all, I'm no fitting guru.

There is a reason why I do this. I could go off and speculate that maybe it is this, maybe it is that, but offering too much information can be just as bad and confusing as too little. There is another, probably even more important consideration to make as well, and that is:


Is this person a similar body type to my own?


What I've found over this years on my own quest for fit, is that lots of people make recommendations, but the ones that are most helpful are the ones with a similar body type. A plus-sized person knows about plus-sized figure issues. C-cup and bigger-boobed women know about full bust adjustments. Big booty women have their specific solutions, and so on...

What would I know about plus-sized adjustments or big booty alterations? Not much. It's not my specialty because I don't alter for those things. Start talking about narrow, forward shoulders, full bust, broad back, and and a dropped fanny and you got my attention. Those things I know a thing or two about.

The problem here is just because I know about full bust issues and a dropped fanny, for example, doesn't mean I'd be good at making recommendations about FBAs and dropped fannies on plus-sized figures. And that is where things get confusing IMO. When people offer suggestions and have a totally different figure type than the person posting the question, it is absolutely well meaning but from a totally different perspective.

So what does all of this have to do with the Saran Wrap Block and the Commercial Pattern? LOTS! And I'll explain why, but be forewarned first because the pictures I'm using are maybe 5 years old, at least, and VERY unflattering--not my fave pics LOL. But necessary for this explanation.
When I first started getting into pattern alterations, I decided to spend one summer specifically working on the FBA, different types of FBAs, and which one would work best for my figure. What did I find out? That I don't use one FBA alteration specifically over another--not much help, huh? And I also discovered that after an FBA, the armhole looks really weird and curvy, to the point where I wonder, "This will work?". Still, not everything clicked that summer. I received lots of advice which actually confused me even more, and the below pics and stories will tell explain why, which is part of the "Watch what you wish for 'cuz you just might get it." comment.

This was the problem I was working with on several years ago, a fitting shell muslin which is displayed in the two photos below. Look at those folds/draglines! A big fold at the armhole and a dragline right up to the bust.


Side front (Wow! Look at that armhole gape and dragline.):


Front:

I posted for advice on the boards because I felt like I ran into a brick wall on this fitting problem. Do you know what the resounding recommendation was? "You need to do an FBA! See those draglines to the bust? You need more length and width."

It kind of does look like I need an FBA, even when looking at the hemline. But I wasn't fixing any issues at that point from the waist down--swayback tuck wasn't done yet so there's quite a bit of extra length in the back that shouldn't be there. I probably should have fixed that before asking the FBA question.

Anyway, I think 90% of the comments were that I need an FBA. So I made another muslin which included an FBA but still the same armhole fold and side seam dragline. With comments to the effect of, "...you probably didn't do a big enough FBA..." Another muslin, with a bigger FBA...same result. After all these FBA's, I realized one thing. In my original muslin in the pics above, I had no stress lines between my bust points AND the darn muslin felt good! Not too tight, not too loose.

Instead of asking more questions online, I decided to check out my fit books. I tried one little fix found in one of my fitting books which mentioned pinning the bust dart deeper. This would, of course, affect the side seam on the front near the armhole, but that would have to be added back in in tissue on the pattern. So I did this, and VOILA!!! Look at the pics below. One little fix and the really bad armhole wrinkle disappeared!!! Now, I still had the side seam dragline but I found my answer to that and you'll have to keep reading to find out about that issue. I still wasn't sure what the entire fit issue was, but I was happy, this was working.


Months later, I decided to take Shannon Gifford's Make a Muslin class as well as Jean Haas' Personal Ease class. The first time I took Make a Muslin, I used a commercial fitting pattern to try to develop a sloper. I got real close and made good progress. But it was a lot of pattern alterations. I was getting a little smarter, but still had so many questions. In Jean's class, it was a revelation to learn that thinner, leaner bodies need less ease, heavier, squishier bodies need more ease. Bust ease, hip ease, etc. is a variable amount! Some people give specific guidelines about how much ease is needed, but it's not that simple. One must consider body type when figuring out an appropriate amount of ease for one's garments. That was an eye opener. So when somebody comments, "You should have 3" of ease at the bustline (on a particular style).", I realized this is likely a body specific comment and something they go by for their own figures. For me, 3" is the MAX amount of ease I want. Lightbulb goes on! Helllooooo...ease is relative and depends on the body type.

Months passed and Shannon's Muslin class was being offered again. I registered again, but this time decided to make a pattern from Kathleen Fasanella's Saran Wrap block. Even Shannon was impressed with the initial fit. Just little tweaks here and there to get it to fit. Things were really starting to come together for me in understanding fit. By using the Saran Wrap block, I had a visual pattern for a sloper that came right off my body. The darts, and everything about it, was body specific. "Kat" specific to be exact.


Everything in my Saran Wrap Block pattern was a reiteration of pattern alterations I was making in Shannon's Make a Muslin class the first time I took it. In addition, I could actually see the same figure quirks on my pattern that were on my DTD that I made in Jean's class. It was all coming together.


Notice on my Saran Wrap Block pattern fronts (shown below):


  1. Right shoulder higher
  2. Curvy armholes
  3. Approximately C-cup sized darts
  4. Darts are slightly curved
Let's move on to the backs:


  1. Right shoulder is not only higher, but the dart is bigger! My right back shoulder blade is fuller and needs more shaping and length than the left side. It's why I sometimes get a diagonal wrinkle above my bust pointing the right shoulder on the front. I get a diagonal wrinkle across my back too.
  2. My back armholes are longer and flatter.
  3. Virtually no waist dart on the left, but a tiny one on the right--again, that's more shaping needed on the right side.

This was a huge eye opener for me. Let me tell you, using a Saran Wrap block pattern in the Making a Muslin class was the most worthwhile fit project I've ever done.


At this point, the only thing I wasn't able to figure out was that diagonal dragline from the side seam to the bust. What was that? How do I fix it? After all, a sloper is fitted and I'm not seeing that dragline on my sloper, only on looser garments. A few months after the Muslin class, I took Shannon's Build a Better Tee class. It was then I found out what that diagonal dragline problem was.


I DID NOT NEED A BIGGER FBA beyond altering for a C-cup as so many kept recommending to me. My armhole and side seam draglines weren't shouting out, "Make the bustline area bigger!" What WAS happening is that I needed more SHAPING. It's the concept of taking a flat piece of wrapping and wrapping a ball. A flatter ball needs small darts, but a full, round mound needs bigger darts. The armhole and side seam folds were darts that were trying to form naturally. Click, click, click...lots of lightbulbs going on. Shannon explained how to handle the diagonal dragline issue and it was absolutely amazing. So simple, really, in retrospect.


My point in all of this is, if you have a hard to fit figure and are having trouble figuring things out, using a Saran Wrap Block pattern under the trained eye of a fit professional can produce amazing results. You may not get everything at first, because fit knowledge takes time, but the effort is worth it "in the end". (There's not really an end to fit knowledge IMO :) .) It was simply the end of that fit issue.


When starting out, it may be unproductive to ask questions regarding fit in a general environment. Not always, but for me it was. Too many suggestions that left me frustrated and not much further in progress than before I started the quest. I've always found that the best answers in retrospect were from the general population (not talking about fitting experts), that had similar figures to mine. They understood the complexity of working off a body similar to my own. So I've learned to filter responses when I ask questions that are not in a professional, class environment. I look at reviews of people who respond so I can see their figure type. Figure type matters IMO.


Now I'm at the point of comparing the Saran Wrap Block to the Commercial pattern. You've seen my block above. Now here's the commercial pattern for that tunic I made up a few days ago as a preview for my sewing student.


Here's the back and what I'm seeing. Of course, the commercial pattern is wider. That's a style issue. Both armholes are long, the pattern being a bit longer. That's okay. I'm just a little worried about back armhole gaping so due to the fact that there is no shoulder dart. Other than there being a lot of pattern ease, I'm not too concerned about the back. The neck is lower and wider, but that could be more of a style detail.


Here is a pic of the commercial pattern front and the saran wrap block pattern. There are some really noticeable differences here. Notice my front armhole is very short and very curvy on the SW block pattern. The commercial pattern's armhole is very long, and much less curvy. Take a look at the bust dart. I look at the commercial pattern's bust dart and instantly know that the B-cup dart does not look like it's going to work for me. These are the two things I notice right away on commercial patterns and instantly know to dart the front armhole. If I don't, it's going to gape. Transfering the armhole dart to the bust dart will give me the shaping I need, and produce a C-cup sized bust dart.


Remember that pink muslin where I made the bust dart bigger just by pinching out more fabric? That is basically the same thing I'm doing here just a different method of going about it.


Here we go with modifying the traced off commercial pattern. Back armhole dart has been transferred to the back shoulder seam and will be eased to the front.
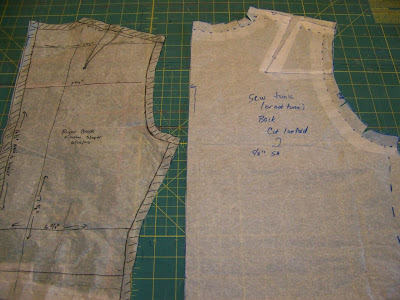

Here's the front. I darted the armhole and transferred the dart to the existing bust dart to make it bigger. Notice how this created a curvier armhole on the commercial pattern, similar to my sloper pattern? Notice how my bust dart is now about the same size as my sloper pattern? Mission accomplished! At this point I went ahead and made the denim muslin of the tunic I modeled a few days ago.


In conclusion, the tunic had the initial fit alterations done. The ones that are body specific for me, the ones I do on most patterns. I also did forward shoulder, and determined that a few more alterations are needed from the muslin. I will raise the armhole so I can make another tunic as a summer dress, lowered the front neck, and took out width at the side seams. I will also add fisheye darts to get a more slimming silhouette.


So there you have it. How I use my saran wrap block sloper and how I compare it to commercial patterns. It is extremely helpful and helps me see where to make alterations. I've looked at my block so many times that the first thing I look at on commercial patterns is the armhole curve and bust dart and instantly know that it will need to be altered--on most patterns. But it didn't start out that way. In the beginning, I was told by well-meaning people, "You need a bigger FBA...a high round back alterations...you have square shoulders..." None of which I needed/had. It was very confusing, almost frustrating. But the point is, it does get better, be persistent, take classes from the fitting pros, try the Saran Wrap block, keep reading, and do lots of muslins. It takes time and the reward is a much better fit in one's garments.


Looking where I am, I realize I have come so far, and still have far to go. It's been a lot of hard work, patience, and persistence.

Wednesday, July 30, 2008

Alterations, alterations, and more alterations!


Last night I had a block of time and had the patterns from the last two tops I made sitting on my ironing board. Before putting them away, I tweaked the patterns with alterations here and there and then put them away. This way, I can just pull them out, cut, and sew--the way it was meant to be ;) ! The knit top with gathers and circular neckline will be made again in a week or two so that has to be ready.


In the meantime, I'm working on Butterick 4183, the green dress version:

I've made this dress before. This dress, along with several strapless dress I've made over the years has high bust gape. Everything fits just about perfect in a 14 (full bust/waist/hip), but the high bust area is way too big. On my first version of this dress, I could pinch out an inch (1/2" dart) on both front/sides.


My sister (who can sews/pattern design/drape) said to remove the excess from the princess seams in the front. I tried that. Just doesn't work. It gives that "Madonna look" and makes my boobs look cone-shaped and comin'-at-ya kind of look. Taking in the side seams does NOT work. I don't need anything removed from the back. Doing this gives me lots of pulls on the back side seam, a little on the front too, with a nice poofy area where I'm changing the seamline on the side seam. So...that method doesn't work well either.


What does work well is if I pinch out the excess, right at the side front on the top edge. A few years ago, my sister said, "Just transfer the excess to a horizontal bust dart." At the time, that boggled my mind. It doesn't boggle it anymore though, since I've gotten much better at alterations.


Last night I altered the front of the pattern, cutting off the dress front below the waist (temporarily) so it is easier to maneuver/alter. I removed the excess (1" which will be 2" total across the entire front edge) and transferred it to horizontal bust dart shown below:

I did notice something that I don't understand. I'm not a fitting guru, but I do know that bust darts aren't supposed to be more than 1" outside the bust circle. The pattern's bust apex is marked with a circled cross. My apex is farther over to the left marked with a dot. You can see where my darts end up/my bust apex, and it's farther away from the pattern's apex.


So here's my question. Why are the pattern darts (the one at the top edge continuing into a long fisheye) so far away from the pattern's bust apex? It appears to be almost 2"!!! My brain is having a hard time trying to comprehend this pattern issue.


However, I'm not coming unglued about this. It is what is. I'll make it up and it should fit fine. No worries really, just comprehension issues for me.

Getting that off my back, now I'm ready to start my day.

Saturday, July 19, 2008

Alterations and Muslins

I always seem to forget that maybe someone out there in cyberland might be interested in the alteration process I use to obtain a decent fit. Or maybe how I implement my design changes on patterns. I always like to see alterations, design changees, and reasons and rationale behind doing them on other blogs. Cenetta is always very good about doing that, and there is always something to learn from posts like hers.

Today I will try to go back and take pictures with explanations of what I've done on two of my patterns thus far. I've worked on revamping my duro top for an updated 2008 look as well as my Simplicity top with the circular neckband and neckline gathers. I made a quick muslin last night of circular neckband top and have finally decided this morning to do a 1/2" FBA on the front and a 1/2" Broad Upper Back Adjustment on the back. Truthfully, I could likely get away without doing them on my knit (the pattern is for a woven). But I dislike the thought of having to get everything out again, repressing the pattern in the future, doing the alterations when I could do them now, first time around.

I noticed on my muslin that the area right near the side back/back armhole area was a little snug. Not uncomfortable at all, but when I look in the mirror and see an outline of my bra band in that small area, that makes me want to alter for broad upper back. On my dress form I'm seeing tiny "forced" gathers pointing to the bust area outside my notches--the area that is not gathered. Yeah, I think a knit would take care of this, but why not do it now. I would like to make this time one more time this summer in a woven.

Since I don't need any width below the waist, I plan on cutting off the front and back bodice pieces at the waist and altering the upper pieces. Then I will tape them back on the lower pieces, truing at the side seams. Also, I'll add about 1" in length right at the hemline. Why add it there? I'm a lazy sewer ;) . Any more than that and I'd use the L/S line.

So stay tuned. I have a busy day today, but when I get home around 6 or 7, the wine cooler will be fully chilled, the popcorn bowl will be ready, and I can enjoy my incredibly exciting Saturday night doing pattern alterations :) !

Only my sewing blogger friends will truly understand how wonderful that is! My own family doesn't get it LOL. And I don't think they ever will.

Monday, March 10, 2008

Alterations! Part 3 - The Sleeves

Sleeves are funny things to me. A bad fit can make or break a garment. Everything will be going well and all of sudden, a poor fitting sleeve will make me want to spit. It's happened. But I've gotten pretty good over the last year or two at judging whether or not the sleeve will work. It's been a lot of trial and error, but this is what I generally do on tops, and to some extent, jackets and coats. Be forewarned! There are lots of pics in this post.

Here is the pic of the traced commercial pattern of the sleeve. Notice that "perfect" bell shape curve. Problem is, I don't have that perfect bell shape. Remember my sloper pattern? I have a long, flat back armhole, and a short, curvy front armhole. This just isn't going to be very flattering if it's made up without some type of alteration stuff.

The first thing I want to do on this sleeve is a forward shoulder adjustment. On the next pic, I drew a horizontal line on the pattern (perpendicular to the grainline) just above the shoulder dots. This will be the cutting line. Notice I also drew a vertical line, which intersects the cutting line, This is my "visual" aid for the 1/2 forward shoulder adjustment. Once I cut on the horizontal line line, I will move the top piece over the right 1/2".

The following pic illustrates the top of the sleeve pattern which has been moved forward a 1/2". Notice how I did NOT true the lines, but rather blended the back and front of the lower pattern piece into the cutting line of the upper pattern piece. This will allow for a flattened back and a bubbled front. Why do I do this? Because that's the way my knobby, bony, forward shoulders look.


The next pic is the *almost* completed pattern piece. Notice the top of the sleeve is no longer the typical bell-shape curve, but rather a flatter, longer back armhole and a shorter, bubbled front armhole.


Which leaves me one more problem that needs to be fixed. The only problem I've found with my sleeve alterations is that it creates more fabric that needs to be eased in the front. Basically an annoying amount of front ease that looks like it shouldn't be there. So my questions is, does anyone else do a forward shoulder like this? Do you get too much extra ease in the front? A certain amount of ease is fine, but I've been getting far too much and it needs to be balanced with the back ease. What I've been doing is removing a bit of that ease by removing the shaded area (a 1/2" on this particular pattern) shown in the pic below. Basically a slash and overlap method. The removal of extra fabric makes things just right. I also did this on my last jacket I made and was very pleased with the results.


Here is the finished sleeve! A bit off grain at the top, but it works for me.


So my question is, does anyone else every have to deal with weird sleeve issues like this? How do you solve them? I've tried other methods of reducing the front sleeve ease but found this method to work best for me.

Now my alterations for this Simplicity top are virtually complete. I'll tissue fit as best as I can at this point, even with it being a knit, to check for length issues. I might want to lengthen the sleeves and the bodice below the waist. Hopefully I can get started on this top next week. It's one of my last winter sewing projects.

Saturday, March 8, 2008

Alterations Part 2--The Front!

Now that the back alterations are done, I'm moving on to the front alterations today for Simplicity 3624, I figured the bust width was fine since I'm using a multi-size blend from 10 at the neck/shoulders blending to a 14 from the upper chest down to hem. I love multi-size patterns for this reason. However, that may not eliminate the gaping that usually occurs on my figure in the lower front armhole. For some that means more bust room. For me it doesn't. There's ample bust room (width). My issue is the shaping that needs to occur from my full bust to my hollow chest. Here are the two fronts--the commercial pattern on the left, the sloper pattern on the right. I'm not too concerned about the armhole depth because the sloper fits like a glove. The area of concern to me is the armhole shape. The commercial pattern has a very gentle curve, the sloper is more pronounced. This curvier armhole shape is what works for me. If I don't alter the curve, I'm going to get pronounced draglines at the lower armhole radiating to the bust.

So what I'm going to do is use my favorite FFRP "shoulder slide" method. If you have the book, it's found on pages 202/203 . This creates a curvier armhole by sliding the front shoulder seam over to the neck by an amount necessary to reduce the gape (usually about a 1/2" for me). What will happen is that the excess at the neck will be cut off and the armhole will need to be filled in with tissue. Here is the commercial pattern shown with the shoulder slide *AND* forward shoulder alteration.

Here is the sloper pattern with my finished front pattern piece with the neckline trued. Notice the curvier armhole shape that more closely resembles the armhole curve on my sloper. The only other additional alteration made was to add 3/8" to the side seam to make my total seam allowances 1" for fit insurance.

And that completes my front bodice alterations. The only other thing I might do would be to move the shoulder seam at the neck forward, maybe 1/4". IMO, that's best left to do in fabric at this point because I don't know if it will be necessary. Tomorrow--the sleeves! And I'm really interested in any comments on how I do my sleeve alteration. I'm wondering if others encounter the same issue I face.

Friday, March 7, 2008

Alterations! Part 1B--The Back.

Continuing yesterday's post, I'll explain what I'm going to do to solve, what I perceive to be, possible back issues.

Since I'm not sure exactly how the back is going to fit/look from the armhole down with the first try of this pattern, I'm going to add princess seams. It took me a while to kind of accept that using princess seams is the option to use, and I don't know why. If the top fits just by adding that seam (and not taking in/letting out any width), then I can always make the second top without them. The print I'm going to use is rather busy, so the seams won't be that noticeable. I could also use waist darts, a dart shift, or some patternmaking "magic" instead, but princess seams are so easy to do and alter so it's a no-brainer for me.

When my commercial pattern was placed on top of my saran wrap block pattern, I transferred the end of shoulder dart to the commercial pattern. Don't know if you can see it, but there's a little + sign on my pattern. I felt this mark was just a little too high for a princess seam marking, so I made another mark about 1 1/2" below it. Then I drew a line from the mid-shoulder to that point and from the hemline to that point. (Sorry about the two lines from the point to the hem--one isn't supposed to be there.) I curve the point area, mark the grainline on the back/side piece, and add the seam allowances.

In my next pic below, if you look at the side seam, there is some "stuff" going on there as well. I've added an extra 3/8" to the seam allowance (1" total) for fit insurance, as well as another extra 1/2" from the waist to the hem for my high hip curves. Additional fit insurance. Between this extra at the side seams and the princess seam allowances, I should be able to create a back that will mold right to my curves. I'll put the top on Phat Chick when it's almost done and pin fit right to my figure for a flattering back. I also did a 1/2" swayback tuck above the waist. The more fitted the back is, the greater potential for puddling of fabric on my short-waisted body. Usually my swayback alteration is somewhere between 1/2" to 3/4".

Good fit and original style. It is kind of a trade-off with design changes, but it's okay. I don't mind making a simple design change like this if the top is going to skim over my curves instead of hugging them in all the wrong places. And princess seams always seem to get lost in a busy print anyway.

The only thing that I haven't done yet is check the length of the top. I'd rather wait until all my alterations are done and tissue fit as best as possible. From there I'll decide if it should be a little longer.

I hope this post has been somewhat coherent. I had to get up a 3:30 a.m. today to drive DD#1 to the school for a DC field trip, and I have to go pick her up at 11:30 tonight. It's been a very long day, and I sure am tired. Did I do any sewing today? Yes! Assembly line production of several purses. They're cute ones too. Getting ready to use my red alligator-style leather from PR Weekend 2007 for a cute handbag and leather is not forgiving of mistakes. Practice makes perfect :) .

Tomorrow--the front alterations! Followed by the sleeves.

Happy Sewing!

Thursday, March 6, 2008

Alterations! Part 1A--The Back.

(Oh! I'm getting excited!!! Last night I worked on doing the alterations for my third pattern out of the four in my current project cue. The last one is the Burda coat, which should be fairly easy since coats are kind of forgiving.)

Now, about today's post topic. After reading the thread that LindsayT created over at Patternreview, it seems that some people like to see alterations that other people do. I never thought my alterations would be of a particular interest to anyone, however several people in my pattern reviews have commented about a nice fit I've achieved with my latest garments. So today I'm going to show you how I approach my alterations using Simplicity 3624 (shown below and the one I did last night) as my example. If it helps anyone out there, then today's (long) post will be worth it.


First off, it's always good to take a long, hard look at my upper body sloper shown in my next picture. It was created from the Saran Wrap block concept found at Kathleen Fasanella's Fashion Incubator site, Saran Wrap Block Method 1 and Saran Wrap Block Method 2 .

Here is the pattern (backs only today, tomorrow I'll do the fronts) I created from my Saran Wrap block. I made it up in 1/4" gingham so I know it fits well.

So...where so I start with pattern alterations? Analysis. Plain and simple. What do I see when I look at my "sloper" pattern backs? A relatively normal shoulder slope, long and flat back armhole, curvier right shoulder (the dart is bigger on the right side), broad upper shoulders, narrow lower back, and a short waist. No big surprises there.

Now I analyze the block with the commercial pattern. I start with the back. I'm a firm believer in the FFRP concept to start with the back before progressing with the front, or anywhere else for that matter. So now I'll begin my analysis of the saran wrap block pattern laid over the commercial pattern. I start by matching the CB waist of both patterns. Why? Because that's the way I like to do it :) . Here is my analysis of what I see from this pic.

The pattern is extremely close in measurements to my own body. Pretty much zero ease from the shoulder to the bottom of the armhole. Is this a problem with this pattern? No, because I'm working with a knit. If it was a woven though, there'd definitely be a problem in the upper vack area, especially on that upper back and upper right shoulder which is wider than than the left. (I don't alter for asymetry in a knit, though, since it's forgiving.) The sloper pattern looks wider at the shoulder, but only because there is a dart in that pattern. The neckline of the commercial pattern drops down in the back. A possible concern is gaping, but that's a fixable problem so I'm not worried about it. Tissue fitting will tell me more. The armholes. Don't match perfectly, but it's easy to drop the armhole a little in fabric so that doesn't worry me too much either. I get leary of dropping it at this point because I want to see how the knit "behaves" when it's on me. Again, tissue fitting will help fine tune that area. The width of the back above the waist might be "tent-ish". Yeah, I'm concerned about that because...look at my next pic and I'll tell you why.

Here's my issue with the back. I swear it was made for a boy!!! The area from the waist to hem has very little difference in width. What??? *I* have full high hips. The pattern definitely doesn't account for full high hips in the back about 3" below the waist--it's very narrow in this area. Yet the area above the waist is huge where I'm narrow. There's a heck of a lot of fabric in that area. This DOES concern me. Gee, I have hip curves. Didn't the pattern model have high hip curves? Duh! I forgot. She's a 19-year old skinny thing who has never had a baby and still has that fast teen metabolism. Likely very little hip curves on her.
What's a girl to do? There are issues to be settled to ensure a good back fit. Check back tomorrow and I'll tell you how I solved my problem. This post is getting a little too long at this point. Best to do it in two sections.

Monday, November 26, 2007

The Last Frontier


Fitting is such a funny thing. It is such... Let's start again :) . For some reason I can't get text off the side of my pic :( . Fitting is such a funny thing. It is such an integral part of sewing, and yet I've really only discovered it since joining Patternreview a few years ago. Before that it was lengthen/shorten, let out a seam here and there, and the process of a good fit has eluded me for the past 26+ years out of my 30 years of sewing. Even in high school, things never fit quite right and I didn't really know why. A few of my friends who sewed to pass the time as an elective class used to get a pretty decent fit. But I was never as lucky.

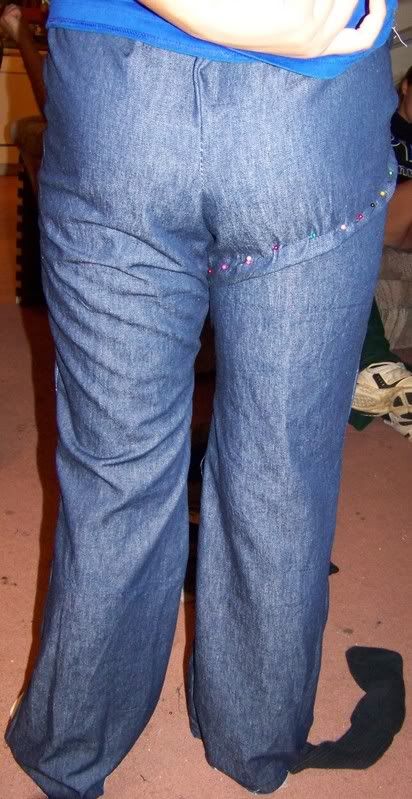
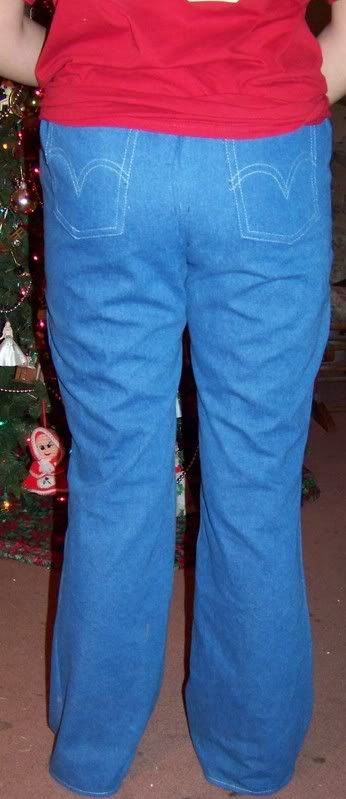
The Internet has been a godsend to me as far as fit is concerned. And it has taken time, not something that has happened overnight, in a month, or even a year. The more I do it, the better I get. So far I've been able to nail down a decent fit for a top or jacket and a skirt. But pants is my last frontier. I've been busy working on mine and my daughter's over the last several months. Since May actually, when I took Shannon Gifford's Make a Pants Muslin class. I start working on it, take a few fitting pics, stop, work on something else, start again, stop again... You get the idea. Right now I've been concentrating my efforts on my daughter's pants. They're almost there. Above are pics of her first muslin. The back looks bad, I know. Deep folds and creases from way too much fabric. Can't do much with those pants as far as alterations are concerned, so I just finished them up so she could wear them. Nothing worse than what I see at school anyway. My second try I was happier with, but it still needs work. On this pair, a few lightbulbs went on as far as pants fitting is concerned. But the deep folds and creases have been replaced with light folds and creases. She also wants a narrower leg and narrower hem. Done. Working on her third pair soon.

It's a tricky thing. I don't want to take out too much length via a fisheye and traditional dart. Doing so would make the pants uncomfortable. So I just pinch out and take a guess. Working with different weights of denim makes things tricky too, in that they lay differently on the body. So I've made another guess for my third try. My first reaction was to take out another inch via a fisheye, but I'm going to go with 3/4" right now. Little tweaks here and there from this point forward. The good thing is, DD#2 likes them! They're comfortable for her. We sometimes joke around that she has, what we call, sensory integration disorder. She has strong likes and dislikes for particular fabrics and fashions. She can't stand the feel of traditional jeans. Doesn't like stiff denim, doesn't like a tight crotch fit, doesn't like tight legs, doesn't like them short (she's developing a long inseam like me), and the list goes on. So the fact that she finds these comfortable and wearable is fine by me. The first pair I made makes me cringe when I look at the back, but hey, they look good from the front LOL. The second pair looks about average compared to what I see in RTW on a lot of people. So I'm getting excited about this third pair.

I'd get excited about *my* third muslin, but dummy me did a foolish thing. I have 4 pieces--a right front, left front, right back, left back for my asymetrical body. Not having worked on it in a month, I grabbed two pieces and started cutting. ACK! I cut 4 backs!!! Please stamp the word "Stupid" on my forehead. I was thinking of salvaging it, but probably won't. What I will do is cut out two fronts from another pieces of denim and use the backs to make sure they fit right. Then alter the pattern if necessary and recut two more backs from the new denim. Darn! I hate making stupid mistakes on fabric I really like. Oh well. It wasn't expensive. And it happens to all of us, doesn't it.

As I work on conquering this "last frontier", I realize there are two very important people I must thank for getting this far. Those two being Shannon Gifford and Jean Haas. What great fitting gurus they are! And so extremely helpful too. They go above and beyond the call of duty and are always available when the class is over to answer lingering questions. Their Patternreview classes are awesome and I've always gotten a lot out of them. Someday I'll meet them in person.
Ending on a happy note, I met PR members Babs and Shura this past Saturday! What great women and we talked about what we love--garment sewing :) . We're hoping to recruit enough people in our area to start an ASG chapter. We have high hopes in getting one going, so please wish us luck in our endeavor. We're planning month meetings at this point and hoping our recruiting efforts will succeed in helping us meet our goal.

Wednesday, October 31, 2007

Instant Weight Loss!


Here's an easy way to lose 10 lbs! Just alter your pants to fit LOL. I've been working on the alterations for DD#2 and check out the left and right side of the pic below with the excess fabric pinched out. The pinched out side makes her look 10 lbs. thinner. Now all I have to do is transfer that alteration to the flat pattern and we're good to go with another pair. Her alterations are basically the same as mine too. She'll wear these pants once I finish, however, the butt alteration can't be done on this pair. Not to worry I told her. I've seen a worse fit on some of the kids at her school. Next pair should look darn good.

It's absolutely amazing what a good fit will do for the rear view, isn't it?!?!