Thursday, January 29, 2009

The Redesign: Santa Monica Tee to Fashionable Tunic

For the past week I've been lusting over a knit tunic top at the Newport News fashion website. Here's a link: The top I want!

There are no patterns like this in my stash, especially with those sleeves. Ever since the closest Hancock's closed, it has put a huge dent in my pattern buying sprees. So what's a girl to do? Get out a TNT tee pattern and get to work redesigning the pattern to look similar to the Newport News tunic. Thinking that maybe somebody might be interested in my love of pattern alterations and redesigning (I'm not kidding--a true geek here), I've documented my journey from the close-fitting Textile Studio Santa Monica Tee to the Phat Chick (Re-)Design. I'm certainly no pro in these areas, but I do love the challenge of both.

Here's a rough sketch of what I want (minus the princess seaming in the upper front bodice). Bear with my lack of artistic/drawing talent:

The TS pattern below is my starting point. I've made this top at least three times and it has been altered to fit--FBA, forward shoulder, broad upper back, with a few more tweaks. This is actually a raglan style, but that doesn't matter to me. I'll be keeping the raglan seams.

So I retraced my altered pattern and added my new style lines. I'll need:
  • A horizontal style line/"empire" seam below the bust on the front.
  • Redesign the neckline to a deep scoop neck.
  • A horizontal style line on the back as well with princess seams above that style line for a precise back fit.
  • A horizontal style line at the elbow area on the sleeve.
  • Slash and spread bottom fronts and backs for gathering.
  • Slash and spread sleeve bottom for balanced fullness.
  • Length added to the front and back bodice pieces.

Here is what I did on all pieces from the bulleted items.

Front: Added the new style line and drew in possible neckline scoops.

Length also added to front:
Front separated into top and bottom.
Seam allowances added to top and bottom fronts at the seamline. Slashed and spread the bottom front to add gathering at horizontal style line:

Back: (the princess seam style lines will NOT extend below the empire style line in fabric). Added princess seam to upper bodice only and added the horizontal style line.

Princess seam style lines and horizontal style line created with seam allowances added. Slashed and spread bottom back to add gathering at the horizontal seamline. Length added.

Sleeve: Horizontal style lined added

Sleeve cut on style line:

Seam allowances added to the horizontal sleeve seam. Balanced fullness added to the bottom portion of sleeve. The lower sleeve seam will be gathered and stitched to the horizontal seam. The sleeve hem will have an elastic casing.

That completes the basic redesign. The muslin has been cut and is ready to stitch up. I'm using some soft-but-ugly grey knit that I purchased for $1/yard during PR Weekend 2006. The intent of that fabric was for knit muslins like this. I really want to cut out my wrap dress but need to clean off my entire kitchen table. Those dress pieces are really long. Maybe this weekend.

Looking forward to testing the redesign...

A Perfect Match!

I received a call today from the owner's daughter of Leather, Suede, Skins in NYC. (I can say her name just fine, don't ask me to spell it though). PR Members that went to PR Weekend 2007 will remember her. She was very helpful. I sent her a swatch of my blue-ish wool and print lining for my jacket/coat and wanted a muted, gold-tone leather to match. About an hour ago she called indicating she had a perfect match! How cool is that?! It will arrive either tomorrow or Monday, and I'm very excited about it. I'll spend at least a day petting and smelling it ;) .

Also, the snow and ice storm here in the Northeast proved immensely productive for me. I tweaked the bust apex position on Simplicity 4047 (wrap dress) and redesigned the Santa Monica tee. My post on the redesign is forthcoming.

Also, I nominate Alexandra, Louella, and Robin for the Kreativ Blog Award! All of them make fantastic garments! These three bloggers are truly creative and make such stylish clothes. If you haven't checked out their blogs, be sure to do so. Alexandra also has this amazing knitting machine with lots of samples as of late. Now that's my kind of knitting ;) . I messed up counting the days in my cycle once and ended up with a 4th cute little bundle of joy. Imagine the mess I'd make with knitting because of not being able to keep track of a stitch count. Machines are good for my subpar mathematical skills. Robin is on the Best of 2008 Pattern page at PR so check that out if you haven't already.

Wednesday, January 28, 2009

Shhhh!!! (A Thank You and a Secret)

A big and heartfelt thank you to Mary and Jackie ! They nominated me for the award shown above. However, I must admit, I'm not terribly creative. In fact, that is one of my sewing deficiencies. So Shhhh!!! Don't tell anyone. It's our little community secret ;) . I am, however, a great copier. Isn't copying the most sincerest form of flattery? Others will dispute that it is one of the most annoying social habits known to man. Thankfully my copying is relegated to fashion and not social issues.


Most of the bloggers I visit have been given the well-deserved nomination, but I think there are still a few un-nominated gems out there that deserve this cyber stamp of creative work acknowledgement. I don't know if I'll be able to round up 7, but let's see if I can at least get 3 or 4. Searching...

Wow! This is Awesome!!!

Check. This. Out.

Several of my many favorite bloggers/PR Members ended up on the Best of 2008 PR page! Let's see here...we have Susan , Robin , Louella , and JodiB (Jodi, if you have a blog, please let me know so I can add it to my blogroll). Congratulations to these bloggers being featured on the Best of 2008 PR article!!! Your garments rock!

Moving on to the Phat Kat sewing plans for the week, I'm doing altering and redesigning of 3 patterns. Last night, I made a few alterations to my Burda coat I just made. After wearing it a lot the past two weeks, I find the neck opening is a tad too big. So I altered the neck opening to make it a bit smaller. In retrospect, I could have gone down to a size 10 because there is a lot of ease in the coat, however, I'll make do with what I've got. Then I removed a little width in the bust to waist area tapering to nothing at the side seam hem.

I don't know if these changes will be that noticeable on the next coat, but it's a start. I'd rather take what I like and make small changes/tweaks each time I make it. I really like my current coat and just want to make a few small improvements in the fit and look.

Today is a snow day, so I'm hoping to get to at least one of two patterns for more changes. One is Simplicity 4074. I made a not-so-good muslin of this (bad fabric), and found the upper bust and bust area to be too big. I have to double check the bust apex position on the pattern so maybe that is the only issue. If not, I'll retrace a size 10 in the full bust area. On the original tracing I morphed from a 10 at neck/shoulders to a 14 at the full bust which usually works. For some reason, it's not working on the muslin of this pattern. I'm going to omit the tie as well. They just don't do anything for my figure when I leave them in.


The next pattern I'm going to work with is a question mark in my mind. There's a knit top on the Newport News clothing website with bell sleeves, low-cut neckline, kind of like a tunic from the under bust down and a t-shirt from the neck to underbust. Hard to describe but I can't save the pic from the website. It will involve a redesign from an already redesigned TNT pattern. I was thinking about using the Simplicity pattern below (from my stash) for it, but am not 100% sure at this point.

I could do the redesign from my Textile Studio Santa Monica tee. Last night I was leaning toward using the Simplicity for it, but this morning the Textile Studio pattern is at the forefront. My current Simplicity pattern has had some major redesigning already on my part, so it might just be easier to go the TS route. The TS has the basic design style already in place. Yes, as I type this, it seems I've just made up my mind! :) The TS Santa Monica Tee it is!

Still waiting to hear back from the leather store in NYC. I sent my fabric and lining swatches so I'm hoping to get some news soon to find out if they have a suitable leather skin for my project. Also looking for some sale-priced wool coating fabric online in some brighter colors. I just can't stand to look at black, grey, and navy at this point. Either red, hot pink, or a nice bold shade of blue would be nice.

Side note--I finally got my hair cut! I have been desparately needing a cut and finally got my wild and long mane under control. I took my current issue of Threads in to my hairdresser and showed her the blonde model with the long layers. That's what I wanted and that's what I got. The Queen of Backhanded Compliments (aka DD#1 LOL) told me she liked my haircut...that it made me look "young". And how was your day???

Saturday, January 24, 2009

"Credit my account please."

Yesterday, before going out, my husband was listening to me mutter, "I don't know if I should take this jacket back...maybe I should." His comment was, "It's only $24!" I replied, "But every time I wear it, I'm going to be fiddling with that fold." Little things like that will drive me crazy. And yet, the general population wears this stuff all the time. They settle for FAR less-than-perfect with nary a thought. I, too, settle for less than perfect at times but there's a limit. DH looks at me like I'm crazy. It's partly principle of the matter--I make things that fit far better than that!

It got me to thinking what I could do with $24. Buy maybe three or four yards of Thinsulate for two coats. So I returned the jacket. Then as I was exiting the store I saw a wall display of jackets by the same "famous-maker" jacket label. It was likely their spring collection, but what astounded me was that virtually every jacket on the wall display had the same yukky fold that my clearance jacket had. It was like a bad dream, and I elbowed my teenage daughter and said, "Look at that! All those jackets have that same awful fold." Of course, she couldn't care less as something like that wouldn't bother her (gives me the "eye roll"). She doesn't know any better. (She has me to teach her about these things ;) .)

I return home and subsequently checked my post comments to see what the concensus was--take it back or keep it. Tamara and Mary were on the Take-it-back side of things. So I'm glad I did. I was also floored that sewing industry guru Kathleen Fasanella took time to comment about the collar and blogged on her site about my collar issue. I've been following the comments and can't wait to find out the root cause of this problem.

Chaos theory at work now...after reading the comments on her site, my interest was directed back to her tutorials. She has some tutorials I haven't seen before, namely the ones on jacket lining. Which takes me back to my recent coat. The only area that I had a minor problem with was the area in the bottom front where the facing meets the lining. My next jacket/coat is in the works so I will be sure to read this info in detail before cutting out my next project.

So, it was just an interesting day yesterday, and I can't wait to learn what is the cause of the ugly fold on the jacket of this "famous-label" line. Check out Kathleen's blog to find out.

Happy Sewing!

Thursday, January 22, 2009

A Great Little Gem of a Book.

Do you have this book?


I bought this book several years ago, read it, and put it back on the shelf. I knew at some point I'd dust it off and use it and decided to do just that two days ago. I also have Jackets for Real People, but there is a reason I love this pocket reference and I'll tell you why.


It covers all phases of tailoring with different methods for each task. It has the couture method, an easy method, an easier method, and (the one I like best!) the easiest method explained in plain English. For example, on my coat back I just made, a piece of cotton muslin or other approriate material is usually used as the back stay. I chose to use a piece of good quality fusible interfacing, and that recommendation is actually in the book as the "Easiest" method ***depending on certain factors*** which was fine for my coat.


I'm not a huge fan of couture sewing and will pick any method that is quicker than doing handstitching of any kind *when appropriate*. However, if at some point in the future (like the "retirement" years LOL) if I wish to do a couture method, what needs to be done is right there in black and white.


Just mentioning this book because it really is a little gem. Inexpensive, but lots of good info in a very easy read format typical of most of the Palmer/Pletsch books. Using the Easiest techniques when appropriate means pressing harder on the sewing gas pedal. Anyone who is a slow sewer like me will likely be just as enthusiastic about this book. Or maybe a little lazy (that's me too!).


Oh, forgot to mention in my previous post. I HAVE A NEW IRONING BOARD!!! If you only knew how awful my current ironing board is, you'd know why I'm so excited about it that I have to text-scream it. My ironing board is over 20 years old and has a permanent tilt. It's so bad that I have to worry about my iron falling off it. DD#1 got in the car and she was mildly excited about it, too, as she saw it laying across the back seat of my van. She actually irons her clothes from time to time. Now I just have to clean some goop off my iron and we'll be good to go.

Disgust with RTW!

Today I had to run some errands and I popped in to a major retailer (department store) in my area. The general impression is that it is a more upscale store than Sears or JCPenney, but IMO our local Sears has far better quality women's apparel.

Two years ago I went hunting for some clearance sales at Sears and found a lovely knee length blazer/jacket in a fab print with a matching red skirt embossed with a velvet design and a gold-toned sweater. Total cost, maybe $40 tops. It was a great deal.
Today I went to the "better" department store looking for some school uniform pants for my boys for next year. I did get the pants, but also went snooping for some good deals. Into the dressing room I took 3 blazers/jackets and two tops. Here's my take on my dressing room experience:

  1. Purple print top. Great print, lovely style. Picked a size Small. The neck was gaping horribly in the back, the bust was snug and pulled, but everything was fine from the underbust down.

  2. Lightish/"lime-ish" green top. Wide, circular neckband with I like. It had a little keyhole cutout in the front with a round metal decoration in the cutout. The top actually fit nicely. But why did they every use a flimsy lightweight knit with this heavy metal decoration? I didn't even have a Wonderbra on and the decoration hit right in my cleavage. Forget this style if you're a C-cup or larger. The darn metal object twisted and turned in the hollow space between my boobs and wouldn't lay like it should. Probably a good thing for me since I'm nickel allergic. Had it fit nicely I probably would have bought it and ended up with a big itchy rash between my boobs. Summer heat only makes it worse and this was a short sleeve top.

  3. Red jacket. Cute style. Had the nice bell-styled sleeve bottoms that are so popular now. But a stretch jacket with a non-stretch lining? And it fit great except for the boobs. Too snug.

  4. First black jacket. Fit great every where on my body except for the back neck. Terrible gaping.

  5. Second black jacket. I can live with this one. It seemed roomy and now I know why--I accidentally purchased a Medium. It was $24. I'm still debating whether to keep or take it back. Please help me decide. My issue on it is below.
Here's the black jacket with that red skirt I purchased from Sears a couple of years ago. Not too bad, but a little too roomy I think:
Not too bad, but here's my pet peeve:

This shouldn't be happening. That's an awful fold, and it keeps wanting to cave in like that. You wouldn't believe how thin the fabric is. It feels kind of flimsy. Yet...Here's the crime of it all--the original price tag!


I paid $24. Still not sure and think maybe I paid too much. It's not a great fit, a little on the big side due to my error. You know how sizes end up on different racks with clearance sales. I'm headed back into town tomorrow and wonder if I should take it back. What do you think?
Anyway, I did send in the fabric and lining swatches for the leather match on my next coat. Actually the fabric is jacket weight which was a little disappointing. I didn't realize how thin it was when it was on the hanger. I could go to option two which was the original plan of using the Vogue Retro jacket pattern. So that's another question hanging over my head at this point.
I'm off to work on some business stuff.

Tuesday, January 20, 2009

Looky, Looky, Looky!!!

Check out these beauties:

Aren't they just lovely?!?! Pat, my sewing student, bought these for me. This was the last day of our first 5-week session. She remembered how much I liked her Gingher scissors that she inherited from her MIL and I was raving about my Gingher No. 5's. Today we had our lesson and she invited me over for lunch as well. After lunch she gave me this present. That was such a thoughtful gesture and VERY much appreciated. This pair is the No. 8 and 4 size.

We're taking a week off and starting up again in two weeks. She has learned a lot in these 5 weeks and I told her to think about projects she wants to do for the next 5-week session. She already has the Textile Studio Basic Dress picked out. We'll do the sleeveless one since she wears this style often during the summer. We'll do a muslin/alter the pattern, then work on this dress in a knit of her choice.

Going back to those scissors...and wiping the drool off my face ;) ! I can't wait to use them!!

Sunday, January 18, 2009

Another Coat in the Works.

Thank you, everyone, for your kind comments on my coat! I wore it out yesterday and today, and it is quite warm and comfortable. The psychology of dressing well (or better than usual) is quite amusing to me. I wore my coat with my black boots and leggings yesterday and the doors opened up for me, literally. People not only hold doors open, but use their body to hold them and use hand gestures, nods, and smiles for entry. Fashion diva DD#1 has given her begrudging nod of approval too.

Anyway...I'm going to make the same coat again! Maybe make it a touch more slimming as it is very boxy. IMO, diagonal welts are a must to add a visual dimension of a slimmer profile. I'll box the armhole/side seam area in tissue and move it in a bit toward the CF, then true the cutting line.

Here's the fabric I pulled out of my closet waiting to be used. It's a blue-ish/purple-ish wool from Paron's in NYC with a lining that I think PR members JodiB or Connie helped me pick out at PR Weekend 2006. I can't remember where the lining came from as we were just looking for any fabric stores that were open in NYC that Sunday morning. Sorry, it is a little blurry but the colors are fairly accurate, at least on my screen.


I'm thinking about calling Leather Suede Skins in NYC and seeing if I could send them swatches of my fabric so they could match a nice gold-toned leather to the fabric and lining. I'm thinking of muted gold-toned leather welts with gold-ish type of buttons. Ones that would match perfectly with the lining. If you have never had the pleasure of going to this store, let me tell you, it's a can't-miss visit. You wouldn't believe the incredible leathers they have. Not just solids but the most amazing finishes in a rainbow of colors. Of course, the more fancy the finish, the higher the price. I have to order more Palmer/Pletsch interfacing, but think I have appropriate interfacing for the leather welts already in my stash.

After that? Maybe a red or hot pink coat. I want colorful coats! But that coat will be a fitted, pea coat style. I think three new coats should hold me for this winter. I already have the pattern for that one, but have to tissue fit it to make sure the fit and proportion is just right.

Also in my plans are this dress for DD#2's Spring semi-formal in May. I bought her one pattern, then another pattern, then this third pattern. We both feel this last pattern is a charm and feel it is THE one. Here it is:

We both really like the green dress. The upward curved empire band would be very slimming IMO. In fact, I like it for myself as much as for her :) . We'll work on fitting and doing a muslin during during my coat projects. Why start so early? May will here in three blinks. She's very excited about picking out fabric for the dress. I told her we will go to JoAnn's. Our closest JoAnn's is about 45 minutes, but they usually have really nice dressy occasion fabrics. She's already telling me that I'll be making all her dresses for a very long time. My reply? "No I won't. Because you are going to learn to love sewing!"

This proud sewing geek is off to pet her wool fabric...BTW, if you want a respite from these bitterly cold temps, check out Susan's blog cruising blog here. You'll feel warm just reading it and looking at her lovely pics.

Friday, January 16, 2009

The Coat is DONE!

What a day! The kids had a two-hour delay so I was able to get the buttons on the coat and call it done! Pictures first, followed by a review.

Here's my version (I tried to get the same pose as the pattern...):


Here's the Burda version on right:

Other views (yeah, I'm back to that black leather skirt. It just goes with everything!):


The significance of the first garment project of the year!:

Working on the review right now. Lots of info on this one. This is my first garment of the year. I like it so much I plan on making another as my next project. Everything went smoothly--no major issues.

Comments on bagging the lining: Claire Shaeffer's instructions in the book are great. However, I probably wouldn't use them for a first-ever lining project. I would highly recommend doing jackets and coats with linings (not bagging them) first. Maybe 2 or 3. Then the concept of bagging will seem pretty clear. Attaching the lining to the facings and neckline is easy. That's what we're typically used to. The hem and sleeve hems are done pretty much the same way. That's the part that can be a little confusing so the instructions have to be followed to a T if you don't bag a lot of linings.

Claire's book covered areas to interface which were very similar to what I already do. She had info on creating sleeve heads from wadding as opposed to batting, the difference being the edges of the wadding can be feathered. It didn't matter for my project because the wool was a nice weight.

The lining was drafted as per Claire's instructions. I was going to use the pattern's lining but nixed the idea. Her lining instructions were clear and they appeared to be very good technique-wise.

I used the 1/2" shoulder pads that were in my stash. Part of the 10 or so pairs I bought back in the mid/late '80's when I thought the big shouldered look would never go out of style LOL. Her lining instructions are written to accomodate shoulder pads too. I topstitched the collar, front edges, and back CB seam. I looked at my daughter's and my pea coat for guidance on where to topstitch.

Here are some more pics of details. Coat front:

Leather welt pocket on front:
Topstitching detail. I used blue thread. I wanted definition of a topstitchingline but no color. I was going to use the blue for the buttonholes but DD#1 said, "No way!" She commented that this was one of those times where she was definite that the buttonholes should be done in black. She looked at the two samples and was sure. So I followed her advice like a good mother ;) . Sure wish it worked the other way LOL.
Sleeve hem/lining:
Coat lining:
Button detail. I think these were from JoAnn's. They were okay. I sure wish I lived closer to NYC sometimes. It would be great to be able to see, feel, and peruse the selection of notions in trim stores.
Back with a topstitched back seam:
That's pretty much it with the photos. Overall, I am so pleased with this coat. It is a little boxy, but I think it works for my figure. My legs are long and thin so it balances out the boxy style. I have some PR Weekend 2006 wool and a matching lovely lining in my stash and I want to make the same coat again. My wardrobe is in desparate need of nice coats. I'm getting tired of the same old, same old, black and grey pea coats I see in the stores.
And I'll tell ya! This coat didn't come too soon! I finished on what will likely be the coldest day/night of the year. Something like a low of 0 degrees Fahrenheit tonight. That means lots of homes in our area with frozen pipes!
Happy Sewing and STAY WARM if you're in 3/4 of the US.

Wednesday, January 14, 2009

Almost Finished with My Coat!

Oh, I'm getting excited! I'll try to take pics in a day or two when it *should* be done. Most of the lining has been bagged, just have to work on the sleeves. A small area between the side seams and front facing was left open for hem fiddling/handsewing. In a previous post, I mentioned by sewing pitfall--inaccurate sewing. I have to work at being precise. Therefore, my front hems at the CF weren't aligning perfectly. I fudged it, now I have to fudge the lining on the one side.

Claire Shaeffer's instructions in her "High Fashion Sewing Secrets" book appears to be very sound IMO. I'm trying to follow her instructions for bagging a lining to a T. Next coat/jacket, I'll use the Palmer/Pletsch instructions in "Jackets For Real People" to make a comparison on the instructions.

Shaeffer's instructions are very clear and the diagrams are good. It would, however, be a little confusing to a newbie sewer, but with much thought one could work it out. The concept of bagging a lining can throw you at first, but it is not really hard. It has been a long time since I've bagged a lining, maybe 15 years. So it's a common sense type of thing, yet has that "new" feeling to me. It's nice to have solid instructions rather than relying on the pattern. That is something I wish I had many years ago.

My one piece of advice for a sewer who is bagging a lining for the first time? When the instructions tell you to pull the jacket through the opening in the sleeve (as per Claire's instructions), DON'T let go LOL :) ! Keep pulling until it's done. Don't set it down to do something else because when you go back to it, you'll be saying, "Now which way do I pull???"

I'm off to ready myself to do the sleeve hems. Gotta get some food in my tummy so I'm ready to go with this.

Monday, January 12, 2009

The "Hard Part" is Done.

If you have never done welt pockets before, DON'T believe it when someone tells you they're hard. They're not. You will, however, need good, thorough instructions, Gingher No. 5 (or similar) scissors that can cut right to a point, and precision measuring/sewing.

I recommend Ann's Welt Pocket article in the January 2006 issue of Threads or Kenneth King's Zippered Welt instructions. I took his class, but he probably has the info on one of his CD's too.

This morning I finished the "hard" part. The precision sewing that is required to make the outside look good. Here is a pic of my morning effort:


Here is a closeup:


The hardest part of doing these welts was the difference in fabric. I've never used leather before as welt lips so the part where Ann has the sewer zigzag the lips together before attaching needed modification. I started handsewing them together with a slipstitch from the wrong side. It wasn't working. My hand sewing needle broke and it was just too tough to do.

I decided to zigzag (yes, I know...I'm working with leather) the lips together with a VERY narrow zigzag with a long stitch length. My hope is that when I pull the stitch out, the holes will be minimal and not noticeable. I mean, we're talking about welt pockets here that aren't at eye level. If someone notices tiny holes on the edges of my welt lips, they're too darn close--get out of my personal space LOL. You can see the zigzag stitching on the closeup with the light blue thread.

Other than that, sewing the welts was a breeze, and as Ann indicates in her article, lots of pressing. And very careful pressing around the leather. If you haven't done welt pockets yet, get going! Let that be another 2009 goal. They are really very easy, so have NO fear! The right tools and good instructions make them a stress-free sewing technique.

The pocket bags will have to wait, probably until tomorrow. My house is a disgrace and the bills need to be paid. I really do think a lot about cleaning. Unfortunately, thinking is about as far as I get much of the time. So if you're sewing this afternoon or evening, I'm envious. But life as to take over some time I guess.

ETA...Does anyone know if there is going to be a Great Coat Sewalong II? I'd love to pick up tips and techniques for better construction.

Slow Moving Progress

Yesterday I wanted to finish the welt pockets, however, I only got as far as doing the openings. Here is where I am:

I only got this far because of the silly things I do (or rather forget to do) when I sew garments. Take this coat. How many coats do I make per year? Maybe one or two. Then I'll go a couple of years, then go back to them. This means a lot of little things I pick up on to do, I forget to do the next time around.

Take the stitching at the neckline and hemlime. I MUST baste in the stitching lines on the collars and front neckline and hems. My problem is I stitch them (my sewing pitfall is accuracy), then find out the hemline is slightly uneven at the CF. I hate that. Then I have to fiddle to get it to look right. Also, I should have spent the extra time cutting out each piece on a single layer of fabric. That would be ultimate grainline accuracy. But I didn't. On the next coat coming up I will do that. Because of those tiny nuances, I had to spend 45 minutes checking, double checking, triple checking the placement of the welt pockets and making sure the angles were correct on each side.

And then there's putting the jacket on the dressform. It helps and it hurts. It's a DTD which mimics any body asymetry. I usually wouldn't alter for asymetry in coats and didn't on this one. So I have to remember not to pay too much attention to a slightly uneven hem. I'm looking at the hem at eye level and virtually no one is going to be looking at it that way. A slight 1/4" dip somewhere is not going to be noticed by anyone but me. I have to remember not to get bogged down with particulars.

I don't know if I'll get the pocket bags on today, but the leather welt lips should get done.

Sunday, January 11, 2009

My Sewing Story

Lindsay posted a nice blog post about "What's Your Sewing Story?" I'm always up for a good story, either a "How We Met", "How I Learned to Sew" or "Tell Me About Your Wedding Day" story. So pull up your chair, grab a cup of coffee, and sit down for another "Sewing Story". I'm going to spend the next 30 minutes typing my story instead of putting away the groceries.

Sewing is genetic for me. My brain was hardwired to learn. It's the paternal grandmother gene that did it. Ironically, I hated going into fabric stores with my mother. The bolt stands were higher than my head and I couldn't see anything. Why she ever went into fabric stores when I was 5, 6, or 7, I'll never know. She rarely sewed, just had no or very little interest.

In 7th grade, I was going to take Home Ec. At the time (1978/1979), all the girls took Home Ec, and the boys took Shop. My friend wanted to take Shop, but the principal told her she would have to get another girl interested to take it--they wouldn't send just one girl to a public school with all the boys (I was in Catholic grade school at the time). It was a 2-year program, and being the eager-to-please type, I said yes to my friend. Shop was okay. I'm glad I took it that year. I made an oak shelf and a metal box.

The following year I was determined to take Home Ec and not Shop. The principal at that point was willing to let a girl go alone in the group of boys and I got the okay to take sewing. We did cooking the first semester, and sewing the second. All the other girls worked on Simplicity overalls as their 2nd-year project, but since I was a first-year sewing student I worked on a Simplicity Jiffy Wrap skirt. I LOVED that skirt! Wore it to my 8th grade "graduation".

That summer I continued to sew. I remember buying a dress pattern. Truthfully, I don't think I made anything that summer. It was the "Summer of Mistakes". But I learned from them and kept at it on my mother's piece 'o shit Montgomery Ward machine. That thing would jam like crazy but I still stuck with it. I begged for a new machine but she said, "You'll get one when you graduate from high school."

I started sewing like crazy as a high school freshman with hits and misses. Even convinced my mom to take the Adult Ed Intro to Sewing class with me at the local Vo Tech. Gosh, it was BORING. It was three weeks before we were even allowed to lay out our fabric. However, the blouse I made was impeccable. After that, I sewed a ton of blouses, then worked on pants, and eventually blazers by the end of my Sophomore year. Much of what I did was self taught by trying to figure out the patterns. My Junior and Senior year in high school, I took Sewing I and II, both were semester courses. I made a mock Members' Only jacket in Sewing II. I absolutely loved that jacket but failed the class. I can't remember what else I made, but I would wear my projects the second I finished them and never handed them in for a grade. My teacher warned me, gave me an Incomplete, but never handed them in for inspection, thus a big fat "F" on my report card. (My mother was livid!) Once I graduated, I received my present--a new White sewing machine. Unfortunately, I didn't get to pick it out. My mom bought it and presented it to me.

In college I made all my sorority date party dresses, a few wardrobe items here and there, then started working on my wedding dress. Once I started working, I made a slew of suits and dresses. When I became pregnant, I made an entire wardrobe of maternity dresses one summer before going back to work in September.

Once DD#1 was born, I would make a lot of overalls for her, pants, and dresses. Bought my Pfaff Hobbylock serger that year too. DD#2 arrived. The girls would get matching Valentine's Day dresses and special occasion dresses. DS#1 arrived and sewing slowed down. DS#2 arrived and sewing came almost to a halt. DD#2 started working on a school project soon after--a "quilt" made out of fabric and posterboard. We used my machine, and on the last block my machine seized up and died. I took it in to our local Sew and Vac, but the owner recommended trading up, said I would be, "...much happier!" I told him I'd see him in 6 months when I had the money. Six months later I took my Janome Memory Craft 3000 home with me. He was RIGHT! I was in sewing heaven with my new machine. At that point, I started sewing a lot more again. The kids were getting older, the boys wanted particulars in their clothes, and there was simply more time since they were almost all out of the toddler stage.

I discovered Pattern Review soon after and started sewing a lot more again and worked on fitting too. Bought an embroidery machine. Working on that Coverstitch machine too. And that's where I'm at.

That's my sewing story. Now be sure to post yours too! :)

Saturday, January 10, 2009

Still working and an almost monumentally stupid mistake.

Update...I'm making good progress on my coat. The lining is all done, the shoulder pads are in, ditto with the sleeve heads.

So I was getting ready to bag the lining, had things pinned, then remembered, "Duh! I didn't do my welt pockets!!!" Can you imagine getting the lining in, then remembering the pockets weren't done??? Whew. So the jacket is on my dressform with right now with paper "welt" rectangles attached to check the placement.

Tomorrow I'll work on the welts and maybe get started putting the lining in.

Wednesday, January 7, 2009

Very Loose Fitting It Is!

I've never worked with a Burda pattern before. This is not from BWOF, but was a pattern I picked up at JoAnn's last February or March. It's my coat I'm working on, and the pattern description says "Very loose fitting". Well that is "very" correct!

Sometimes pattern descriptions are not very accurate, but this one is. I like the coat, but was not necessarily prepared for the "bigness" of it. It was tissue-fitted last March so I probably forgot. The shoulders are dropped, but I did narrow the shoulders in tissue so they're about where they should be for this style. The sleeves have draglines as one would expect from the roomy fit. When I was sitting down dusting off my pattern several days ago and figuring out where I left off, I noticed the biggest clue that it was going to be this way--no shoulder darts or princess seams. So really, I was mentally prepared for a boxy jacket.

Here's the current state of the jacket on my dressform--just the fashion fabric layer:


Since this is almost a year later, my tastes have changed over the last 9 or 10 months and I'm currently interested in another pea coat for my closet. I'll get to that, but not until I finish this coat. The body is finished, and over the next week I'll work on the lining/interlining layer and welt pockets. The pattern has welt pockets as step 2 or 3, but I save that for last. Experimentation with position will be necessary.
Overall, a very productive day. Thanks to an ice storm which kept everyone inside :). And thankfully, with no power outages.

Tuesday, January 6, 2009

Those Welt Pockets.

I was able to finish the interfacing and stitch and topstitch the CB seam of my wool coat. Then I got lucky--bad weather! We stayed home and I had a three-hour time block to work on my leather welt pockets. I studied the size of the leather welts on DD#1's Varsity jacket, looked at a jacket I made with welts about two years ago, and decided on an appropriate size. The welts are 3/8" wide.

The leather was giving me a little headache. I surmised ordinary interfacing might not be suitable and found some hair canvas from my revamped leather skirt I worked on a while back. When I removed the waistband, I saved the interfacing knowing it might come in handy. It did tonight. It is keeping the welts crisp with no stretching. I'm using my fave welt instructions--Ann's article from Threads.

The only thing that was difficult on my welt sample was keeping the lips together. I couldn't zigzag them so I omitted that step and it certainly made the alignment difficult. For the real deal, I'll handstitch on the wrong side of the crease to keep the lips together. I'm saving the welts from the sample for one of the pockets on my jacket. No way is the leather going to be wasted. One of the welts will have to be rebasted as there is a little pulling/stretching of the leather on the lower lip. Not noticeable to anyone but a sewer looking for as much perfection as possible.

I'll leave you with two pics--the sample welt and the possible position on the front:


Nighty night! I'm off to dream about coats :) .

Early Progress for the Year

Trying to keep with my New Year's Resolutions early!


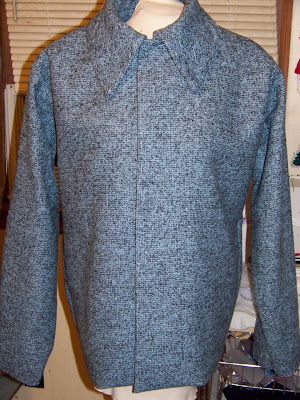
I've been working on my winter coat, the one I last worked on last March. Here's the pic from the Burda pattern--using the short version.


You can't see the details but the short version has front, slanted welt pockets. I'm using my light blue/black Paron's wool (PR Weekend 2007) and my black leather for the welt pockets from Leather Suede Skins, I think that's the name of the store (also PR Weekend 2007). The buttons purchased for it are from Pacific Trims.


The fashion fabric has been cut since last Spring, but that was it. I spent about 15 minutes trying to figure out where I was with it a few days ago, and what my next task would be. Deciding the pattern's lining instructions were not to be, I pulled out my High Fashion Sewing Secrets book by Claire Schaeffer and drafted the lining as per her instructions as well as using her guidelines for interfacing. Her interfacing info is pretty much what I already do, and the only thing changed was using fusible for the muslin interfacing piece on the back. Why? Because I just didn't feel like and pressing more fabric. Yes, lazy, lazy, lazy on my part!


Here's the last piece I worked on yesterday.


Fusing the interfacing is at least a two-day process for me. It just takes so much time. But today is my third day and all that needs to be done is to finish the collar interfacings as well as the sleeve and back hems. So progress IS being made. Some of the interfacing had to be pieced which made things take a little longer, but oh well. We sewers make do with what we have.


The lining is all cut out, just have to cut out the interlining which will be cotton flannel. I'm going to hand baste the lining and flannel together, then treat that as one layer for the lining. Also, there is a decent amount of this fabric leftover too. I asked my sister to pick up more yardage so I could make a matching skirt. But first things first--FOCUS! Let's get this coat done. It will take me about a week at this point. Lots of interruptions and things to do, but I'd really like a new coat by next week.


A few days ago I discussed my daughter's desire for a pea coat, and we picked one up at NY&Company for $45. I just couldn't beat that cost. (Thanks, Lindsay!) She gets it on a teen's schedule ("Now!"), and I get to do my coat without hearing her ask, "Is my coat done YET???" If I made it, it wouldn't be done until the end of January anyway so buying RTW makes her happy, makes me happy.


While waiting for my interfaced pieces to cool on my ironing board, I whipped up a hat and scarf. The scarf was for DS#2. Just a simple one this time which took all of five minutes. One layer of fleece, fringed the ends. He's been bothering me for a scarf for two months! Check out this happy boy:


I also pulled out my Great Copy Patterns "Polarfleece Pizzazz" book by Spiegelhoff and Laube. I whipped up a hat for my DH in 30 minutes. The patterns are all in the book or it tells you what to measure and cut. He needs one for the windy, cold, snowy days when he's out plowing with the lawn tractor. This is the Alpine Hat from the book. What I really like about it is the band is a double layer. It really keeps the ears warm and toasty. Here's his new, easy-peasy hat:


My boys have the same hat in a smaller version with their names embroidered on the inside.

Last thing on my mind is my daughter's dress for her May semi-formal and more coat ideas for me. On my recent trip to Walmart, I picked up the following patterns. Here's the one for DD#2:


DD#2 was NOT sold on this dress. I know, however, the style would look fabulous on her. Her comment about the main pattern photo--"It looks like a nightgown!" Okay. What's a mother to do? Search out if any other PR members have whipped this up. Nancywin did and here is her absolutely lovely creation she made for her friend's daughter. See her link: Nancy's gorgeous creation . Once DD#2 saw it in a different fabric, she was hooked! Her response? "Wow!" What's nice is that the girl in the review photo is about her age, similar body type, and the dress looks terrific. She is now very amendable to the idea of using this pattern for her semi-formal dress. In a few weeks, I'll work on a muslin for it.


I also picked up a coat pattern for me. Here's the Project Runway pattern that caught my eye:


There's several different style options and I liked the princess seaming on the coats. I'm looking for a pea coat style with different collar options and this pattern fit the bill. All those fabulous Paron's wools are screaming at me! They're yelling, "Make me into a coat!!!" Yes, I will oblige.


Last, but not least, I finished up my son's UFO jeans. I started these two months ago. Every time I whip up a batch of new jeans/pants for him, the first one is his test pair. I alter the pattern for growth, then test it out. All is well with this pair. I forgot to put the topstitching on across the back pocket at the top, but who cares. He doesn't. He always wears his shirts out so no one will ever notice that. Made them long so he'll have room for growth. Once his shoes are on, the pant legs lay a bit nicer without as much bunching at the bottom. He's modeling them here--nothing to write home about as they're just an easy pair of pull-on elastic waist jeans:


Here's a pic of the jeans on the couch. These test pairs are perfect to use up those bobbins of thread in my sewing machine storage box. On the waistband, I used a blue thread which doesn't really match well. But like I said before, he doesn't tuck in his shirts, wears them long, so no one is going to see. The other topstitching like at the hems and pockets, yes, that does match though.


One or two more pairs are in the works, but I don't know about next year. I'm not too happy about it, but the public school districts in our area are beginning to mandate school uniforms/universal dress code for next year, ours included. The outset of these programs is very costly. With four kids, the cost is really going to be high for that first year. One of my friends told me, "At Walmart the polo shirts are $6!" I know she was happy about it, I was not. Walmart quality is not going to hold up for my kids. I'd rather purchase Lands' End and Dockers and make some pieces in between. Also, I like buying my boys' clothes from Sears because of their Kidvantage program. Looking for Docker's sales--they're just not happening right now.

I know people think that I can sew and save money, but we all know it doesn't work like that. We pick and choose what to make, sometimes based on cost and time. So I'll be checking out sales for the uniform options whenever I can.

That's it for now. Happy Sewing!

Thursday, January 1, 2009

Glancing Back, and Moving Forward

Happy New Year, fellow bloggers!

I have a personal motto that I follow, "Look where you're going, not where you've been!" So at this time, I will not look back, but take a small glance at the past 12 months to establish where I'm headed over the next 12.

I sewed up a lot of projects that I've been very happy with, with just a few duds in between. I wouldn't call some of these projects my best, but are the ones I was very happy with and wore a lot. Didn't sew up as many garments as I wanted to because I was working on some wallhangings, purses, Christmas scarves and the Chinese Auction quilt, but I definitely learned new things by working on non-garment sewing activities. In addition, I've been making good use out of my embroidery machine and earning respect from my children because of it ;) .

Here are my top 5 garments, not like I made enough of them this year though.

They are:

Butterick 4183. It's been in my stash for about 5 years now. I bought it to make a dress for my 20th High School Reunion several years ago, which I did, but I just love the simplicity of the design. It's a cool and delightful summer day dress.


Next up,


Simplicity 3624. A youthful, trendy design which suits this 40+ chick just fine. And a reminder by this photo not to take review pics early in the morning. It looks like I never went to bed!


Simplicity 4277. Heavily revamped/altered version. I always feel cheerful in this top. And it highlights the "female assets" well ;) .


Simplicity 3799. Made the neckband wider with crystal embellishments. Sparkly stuff brings out the inner '80's me. Matches my big hair well :) .


Threads top from the Pattern-less Sewing article. It's such a different style and print for me. I have yet to wear it because it's waiting for matching capris pants.


My fave accessory project. Too bad I don't own it. It was a Mother's Day present for my mom:


Made from Emma Brennan's Vintage Handbag book.


The year 2008 produced two wadders:


One horrible "supposed-to-be" cute, slouchy mini dress. Turned out to be a shapeless potato sack that I chopped up hoping to salvage, to no avail. Here's what was left of it before tossing.


Simplicity 4183, a Patty Reed design. SO not for me. Made me look short and 20 lbs. heavier. Here's what's left of it. It left jaw-dropping looks from every member of my family, and a "You're not going out in that...are you?!?!" comment from my DH. 'Nuff said.


and Simplicity 4047. The photo makes it look better than it is. A crappy polyester that won't give a good press and a pattern morph from size 10 at neck/shoulders/mid chest to a 14 at full bust and waist and a 12 at the hips. Surprisingly, the full bust area was much too big! What's up with that? With a full C-cup??? This was a wearable muslin. Wearable, but I don't like it. I will change the sizing on top before making a dress in 2009 from this pattern in some Slinky in my stash.


That's pretty much it sewing wise for 2008. I did many more crafty type of things, more than I care to, but learned things from it.


On to my SEWING GOALS FOR 2009!


In no particular order:


  1. Get to know my various presser feet. I'm a lazy sewer and will waste time trying to figure out how to do something without changing the snap-on feet. Yes, I did say snap-on! It goes back to the days of using cams and I never wanted to bother with them. I have to get over that mentality of "It will stop my sewing" and think "It will actually make my sewing easier and save time."

  2. Do more "Thinking Woman's Sewing". I need coats. I need blazers. I need pants. My custom pants draft is done. Untested. Gotta get going with these things. It's been a long timed since I've done a lined blazer. Far too long.

  3. Embroider 300 designs this year. I have the machine. It does the work for me. All I have to do is change the threads. I want to think outside the box with embroidery and think of ways to apply my embroidery to accessories and garments. I have about 5 already done (got started early!)
My last sewing activity of 2008/first of 2009 was checking out Karen's blog. I check out my blogroll every couple of days, but then don't get to some. Then I'll wait thinking I need a bigger chunk of time because the posts pile up. Then it becomes an overwhelming number. Hers was at 32!!! So I spent my New Year's Eve and New Year's Day morning looking at her amazing work the past two months. I'm having serious sewing envy over her orange leather bag and her leather-look jacket.

Then it got me to thinking about the PR Awards this year. And, of course, some I voted for and some I didn't. So I'd like to present my own for the obvious reasons of the award titles.


PHAT SEWING AWARDS OF 2008

That's it for today, New Year's Day 2009. May it bring peace, lots of sewing time, much-needed prosperity, and an end to CEO's making millions with failing companies.

Happy New Year's, and I'm off to co-make a meal of Scalloped Potatoes, Filet Mignon with mushrooms and onions, asparagus with Hollandaise sauce, and some dessert. I'll assign DD#1 to the dessert task. She always full of surprises.