When people post about fitting problems, I love to read what people suggest the solution will be. Some will be spot on, some will be way off, some have ideas and suggestion that are close to the most effective and viable solution to the fit issue at hand. I only make suggestions if I identify with the body type or have dealt specifically with the same fit issue. After all, I'm no fitting guru.
There is a reason why I do this. I could go off and speculate that maybe it is this, maybe it is that, but offering too much information can be just as bad and confusing as too little. There is another, probably even more important consideration to make as well, and that is:
Is this person a similar body type to my own?
What I've found over this years on my own quest for fit, is that lots of people make recommendations, but the ones that are most helpful are the ones with a similar body type. A plus-sized person knows about plus-sized figure issues. C-cup and bigger-boobed women know about full bust adjustments. Big booty women have their specific solutions, and so on...
What would I know about plus-sized adjustments or big booty alterations? Not much. It's not my specialty because I don't alter for those things. Start talking about narrow, forward shoulders, full bust, broad back, and and a dropped fanny and you got my attention. Those things I know a thing or two about.
The problem here is just because I know about full bust issues and a dropped fanny, for example, doesn't mean I'd be good at making recommendations about FBAs and dropped fannies on plus-sized figures. And that is where things get confusing IMO. When people offer suggestions and have a totally different figure type than the person posting the question, it is absolutely well meaning but from a totally different perspective.
So what does all of this have to do with the Saran Wrap Block and the Commercial Pattern? LOTS! And I'll explain why, but be forewarned first because the pictures I'm using are maybe 5 years old, at least, and VERY unflattering--not my fave pics LOL. But necessary for this explanation.
When I first started getting into pattern alterations, I decided to spend one summer specifically working on the FBA, different types of FBAs, and which one would work best for my figure. What did I find out? That I don't use one FBA alteration specifically over another--not much help, huh? And I also discovered that after an FBA, the armhole looks really weird and curvy, to the point where I wonder, "This will work?". Still, not everything clicked that summer. I received lots of advice which actually confused me even more, and the below pics and stories will tell explain why, which is part of the "Watch what you wish for 'cuz you just might get it." comment.
This was the problem I was working with on several years ago, a fitting shell muslin which is displayed in the two photos below. Look at those folds/draglines! A big fold at the armhole and a dragline right up to the bust.
Side front (Wow! Look at that armhole gape and dragline.):

 I posted for advice on the boards because I felt like I ran into a brick wall on this fitting problem. Do you know what the resounding recommendation was? "You need to do an FBA! See those draglines to the bust? You need more length and width."
It kind of does look like I need an FBA, even when looking at the hemline. But I wasn't fixing any issues at that point from the waist down--swayback tuck wasn't done yet so there's quite a bit of extra length in the back that shouldn't be there. I probably should have fixed that before asking the FBA question.
Anyway, I think 90% of the comments were that I need an FBA. So I made another muslin which included an FBA but still the same armhole fold and side seam dragline. With comments to the effect of, "...you probably didn't do a big enough FBA..." Another muslin, with a bigger FBA...same result. After all these FBA's, I realized one thing. In my original muslin in the pics above, I had no stress lines between my bust points AND the darn muslin felt good! Not too tight, not too loose.
Instead of asking more questions online, I decided to check out my fit books. I tried one little fix found in one of my fitting books which mentioned pinning the bust dart deeper. This would, of course, affect the side seam on the front near the armhole, but that would have to be added back in in tissue on the pattern. So I did this, and VOILA!!! Look at the pics below. One little fix and the really bad armhole wrinkle disappeared!!! Now, I still had the side seam dragline but I found my answer to that and you'll have to keep reading to find out about that issue. I still wasn't sure what the entire fit issue was, but I was happy, this was working.


Months later, I decided to take Shannon Gifford's Make a Muslin class as well as Jean Haas' Personal Ease class. The first time I took Make a Muslin, I used a commercial fitting pattern to try to develop a sloper. I got real close and made good progress. But it was a lot of pattern alterations. I was getting a little smarter, but still had so many questions. In Jean's class, it was a revelation to learn that thinner, leaner bodies need less ease, heavier, squishier bodies need more ease. Bust ease, hip ease, etc. is a variable amount! Some people give specific guidelines about how much ease is needed, but it's not that simple. One must consider body type when figuring out an appropriate amount of ease for one's garments. That was an eye opener. So when somebody comments, "You should have 3" of ease at the bustline (on a particular style).", I realized this is likely a body specific comment and something they go by for their own figures. For me, 3" is the MAX amount of ease I want. Lightbulb goes on! Helllooooo...ease is relative and depends on the body type.
Months passed and Shannon's Muslin class was being offered again. I registered again, but this time decided to make a pattern from Kathleen Fasanella's Saran Wrap block. Even Shannon was impressed with the initial fit. Just little tweaks here and there to get it to fit. Things were really starting to come together for me in understanding fit. By using the Saran Wrap block, I had a visual pattern for a sloper that came right off my body. The darts, and everything about it, was body specific. "Kat" specific to be exact.
Everything in my Saran Wrap Block pattern was a reiteration of pattern alterations I was making in Shannon's Make a Muslin class the first time I took it. In addition, I could actually see the same figure quirks on my pattern that were on my DTD that I made in Jean's class. It was all coming together.
Notice on my Saran Wrap Block pattern fronts (shown below):
- Right shoulder higher
- Curvy armholes
- Approximately C-cup sized darts
- Darts are slightly curved
 Let's move on to the backs:
- Right shoulder is not only higher, but the dart is bigger! My right back shoulder blade is fuller and needs more shaping and length than the left side. It's why I sometimes get a diagonal wrinkle above my bust pointing the right shoulder on the front. I get a diagonal wrinkle across my back too.
- My back armholes are longer and flatter.
- Virtually no waist dart on the left, but a tiny one on the right--again, that's more shaping needed on the right side.

This was a huge eye opener for me. Let me tell you, using a Saran Wrap block pattern in the Making a Muslin class was the most worthwhile fit project I've ever done.
At this point, the only thing I wasn't able to figure out was that diagonal dragline from the side seam to the bust. What was that? How do I fix it? After all, a sloper is fitted and I'm not seeing that dragline on my sloper, only on looser garments. A few months after the Muslin class, I took Shannon's Build a Better Tee class. It was then I found out what that diagonal dragline problem was.
I DID NOT NEED A BIGGER FBA beyond altering for a C-cup as so many kept recommending to me. My armhole and side seam draglines weren't shouting out, "Make the bustline area bigger!" What WAS happening is that I needed more SHAPING. It's the concept of taking a flat piece of wrapping and wrapping a ball. A flatter ball needs small darts, but a full, round mound needs bigger darts. The armhole and side seam folds were darts that were trying to form naturally. Click, click, click...lots of lightbulbs going on. Shannon explained how to handle the diagonal dragline issue and it was absolutely amazing. So simple, really, in retrospect.
My point in all of this is, if you have a hard to fit figure and are having trouble figuring things out, using a Saran Wrap Block pattern under the trained eye of a fit professional can produce amazing results. You may not get everything at first, because fit knowledge takes time, but the effort is worth it "in the end". (There's not really an end to fit knowledge IMO :) .) It was simply the end of that fit issue.
When starting out, it may be unproductive to ask questions regarding fit in a general environment. Not always, but for me it was. Too many suggestions that left me frustrated and not much further in progress than before I started the quest. I've always found that the best answers in retrospect were from the general population (not talking about fitting experts), that had similar figures to mine. They understood the complexity of working off a body similar to my own. So I've learned to filter responses when I ask questions that are not in a professional, class environment. I look at reviews of people who respond so I can see their figure type. Figure type matters IMO.
Now I'm at the point of comparing the Saran Wrap Block to the Commercial pattern. You've seen my block above. Now here's the commercial pattern for that tunic I made up a few days ago as a preview for my sewing student.
Here's the back and what I'm seeing. Of course, the commercial pattern is wider. That's a style issue. Both armholes are long, the pattern being a bit longer. That's okay. I'm just a little worried about back armhole gaping so due to the fact that there is no shoulder dart. Other than there being a lot of pattern ease, I'm not too concerned about the back. The neck is lower and wider, but that could be more of a style detail.

Here is a pic of the commercial pattern front and the saran wrap block pattern. There are some really noticeable differences here. Notice my front armhole is very short and very curvy on the SW block pattern. The commercial pattern's armhole is very long, and much less curvy. Take a look at the bust dart. I look at the commercial pattern's bust dart and instantly know that the B-cup dart does not look like it's going to work for me. These are the two things I notice right away on commercial patterns and instantly know to dart the front armhole. If I don't, it's going to gape. Transfering the armhole dart to the bust dart will give me the shaping I need, and produce a C-cup sized bust dart.
Remember that pink muslin where I made the bust dart bigger just by pinching out more fabric? That is basically the same thing I'm doing here just a different method of going about it.

Here we go with modifying the traced off commercial pattern. Back armhole dart has been transferred to the back shoulder seam and will be eased to the front.
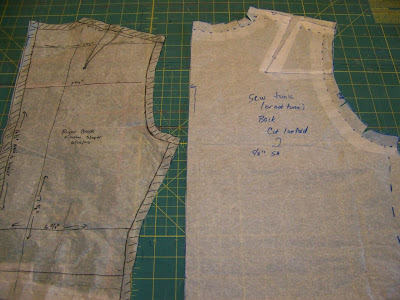 Here's the front. I darted the armhole and transferred the dart to the existing bust dart to make it bigger. Notice how this created a curvier armhole on the commercial pattern, similar to my sloper pattern? Notice how my bust dart is now about the same size as my sloper pattern? Mission accomplished! At this point I went ahead and made the denim muslin of the tunic I modeled a few days ago.
In conclusion, the tunic had the initial fit alterations done. The ones that are body specific for me, the ones I do on most patterns. I also did forward shoulder, and determined that a few more alterations are needed from the muslin. I will raise the armhole so I can make another tunic as a summer dress, lowered the front neck, and took out width at the side seams. I will also add fisheye darts to get a more slimming silhouette.
So there you have it. How I use my saran wrap block sloper and how I compare it to commercial patterns. It is extremely helpful and helps me see where to make alterations. I've looked at my block so many times that the first thing I look at on commercial patterns is the armhole curve and bust dart and instantly know that it will need to be altered--on most patterns. But it didn't start out that way. In the beginning, I was told by well-meaning people, "You need a bigger FBA...a high round back alterations...you have square shoulders..." None of which I needed/had. It was very confusing, almost frustrating. But the point is, it does get better, be persistent, take classes from the fitting pros, try the Saran Wrap block, keep reading, and do lots of muslins. It takes time and the reward is a much better fit in one's garments.
Looking where I am, I realize I have come so far, and still have far to go. It's been a lot of hard work, patience, and persistence.


 Here is my back pattern piece. Notice the difference between the pattern's original dart (green), and my new darts (purple). That is quite a difference. I actually need two darts for a better fit of varying widths and lengths. And whew! Again, the length of the dart is way too long.
 Here is duct tape pattern superimposed over the original pattern. Align the CB and the proper dart placement, length, and width is evident. The change has been made.